Can you completely wipe a hard drive?
Yes, you can completely wipe a hard drive, but you’ll need to do more than simply delete the files stored on it. Deleting files from a hard drive doesn’t actually remove them — it just reassigns that space so new files can be added later on. To clean a drive completely, you need to actually erase the data.
Properly wiping a drive ensures the files are erased and truly gone and prevents anyone from recovering the deleted data. This is why it’s so important to learn how to wipe your hard drive before selling or discarding computers and external storage devices.
If you just want to free up disk space on your hard drive, you can find and delete temporary files hiding in odd places. Or, you can consider defragging your hard drive to add some space. But, these solutions aren’t ideal if you plan to get rid of your hard drive afterward.
Wiping a hard drive is also an essential part of reformatting a drive — when you delete all the data on it and change its file system to match a new operating system. Before the drive can be reformatted for the new system, all the old data needs to be wiped clean.
When should I completely wipe a hard drive?
-
When selling, trading in, or throwing out a computer
Always wipe your hard drive any time you’re getting rid of a computer — whether that’s the internal drive in your computer or an external USB drive. This ensures that any personal data on the drive will be unrecoverable should someone else try to do so.
-
When getting rid of damaged drives
While damaged hard drives may not be usable, that doesn’t mean they’re completely useless. Someone can still recover the data from them, which they can then perhaps sell on the dark web, use to commit identity theft, or guess your passwords.
Though solid-state drives (SSDs) with TRIM enabled will automatically overwrite deleted files, perform a wipe to be 100% sure your hard drive is clean.
-
When upgrading to a solid-state drive
After upgrading from a hard disk drive (HDDs) to a solid-state drive (SDD) and migrating your data to the new drive, wipe your old hard drive if you’re planning on giving it away or getting rid of it. You can also buy a casing for your old drive and continue using it as an external storage device.
When starting over from square one
Completely wiping a hard drive and starting anew is surely a drastic option, but it’s also an effective way to restore an older hard drive — or PC — to maximum possible operating efficiency. Wiping your drive can help fix 100% disk usage on Windows, and remove all the bloatware you’ve unknowingly collected.
How to wipe a hard drive in Windows
You have a few options for wiping a hard drive in Windows 11 or Windows 10. We’ll guide you through each procedure in both versions of Windows to help you clear your data and keep it safe.
Before you start
Always back up your data before wiping a hard drive or making any other significant changes or repairs to your PC. Cloud storage solutions as well as external hard drives are both great ways to keep your data safe in case something goes wrong. You can even clone your hard drive, which will give you a complete copy of your entire disk.
Save your passwords and any other important credentials — once you wipe your hard drive, there’s no getting the data back. If you don’t plan to keep this computer, create a Windows recovery drive so you can reinstall Windows on your new machine if needed.
Creating a recovery drive is the same in Windows 11 and Windows 10. Here’s how it looks in Windows 11:
How to create a Windows recovery drive in Windows 11 or 10
-
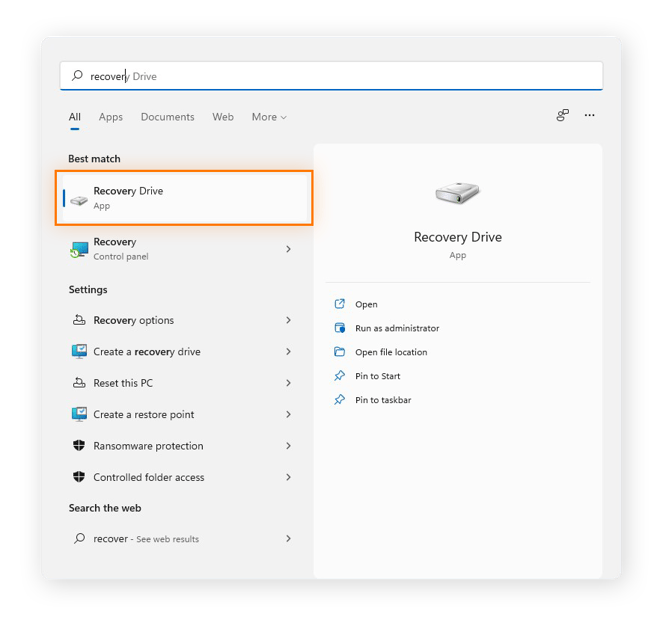
Type recovery drive into the search box or Start menu and select Recovery Drive. Click Yes to allow the Recovery Media Creator app to make changes to your device.
-
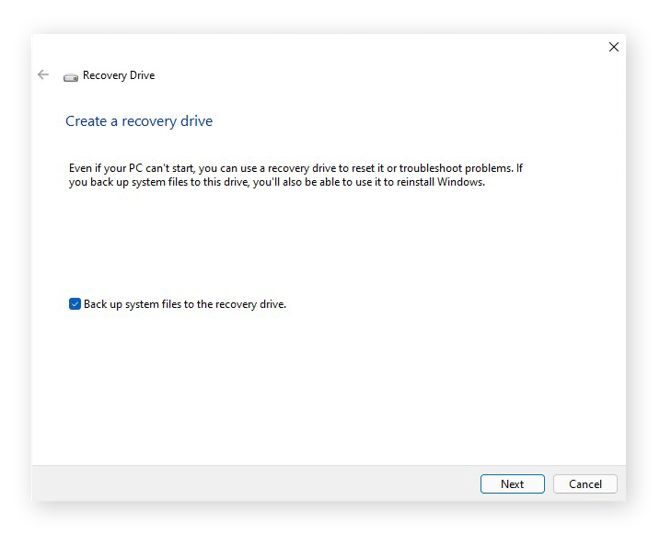
Make sure the box for Back up system to the recovery drive is checked, then click Next.
-
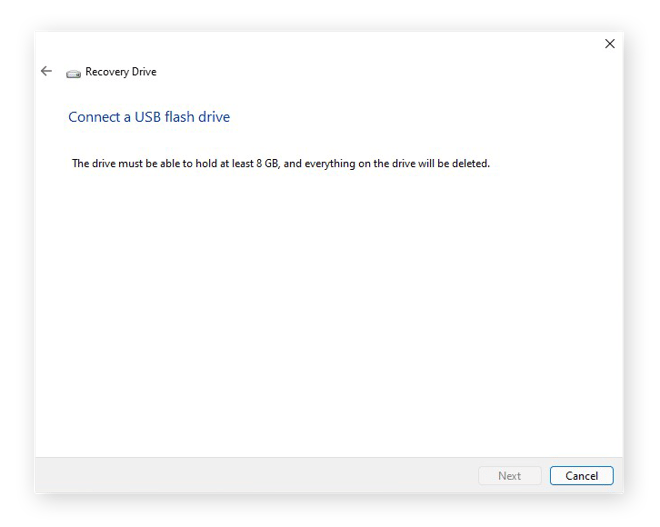
Connect your external drive to your computer via USB. Click Next, and then click Create on the following screen.
Format an external drive
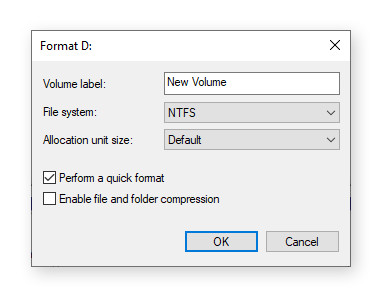
Formatting an external storage device wipes any data on it and prepares it for use with your device. Here’s how to reformat a hard drive with the Format tool on Windows 10:
-
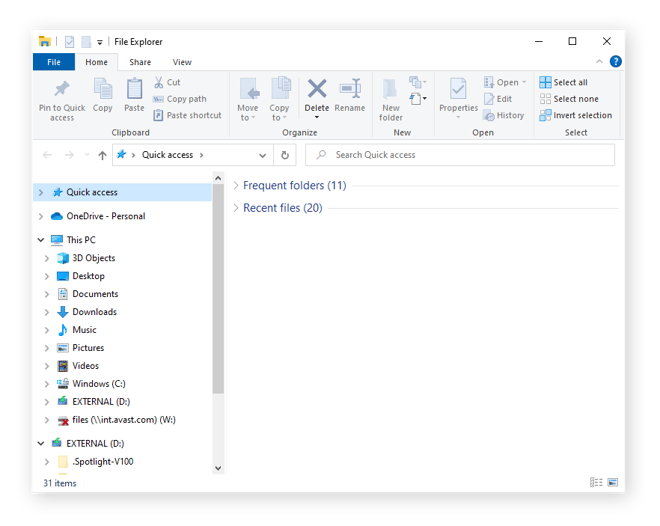
Connect the USB drive to your PC. Then, open the File Explorer app.
-
Right-click the external disk and select Format. Choose a file system and follow the instructions.
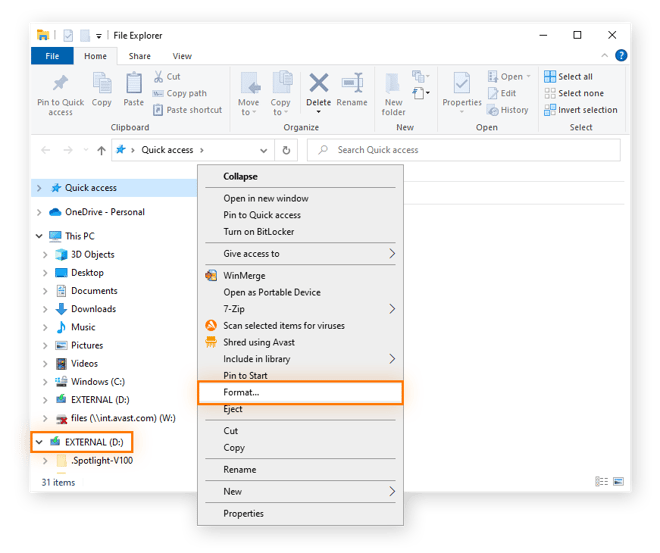
If your external drive doesn’t appear in File Explorer, that may be because its current format is incompatible with Windows. In that case, you need to use the Disk Management tool to wipe it.
Use Disk Management to wipe a hard drive
The Disk Management tool can divide disks into partitions, or volumes. It’s like putting up a wall in a room to create two rooms. You can use Disk Management to wipe a disk that isn’t formatted for Windows, but you need to be logged in as an administrator.
Here’s how to use Disk Management to wipe a disk in Windows 10:
-
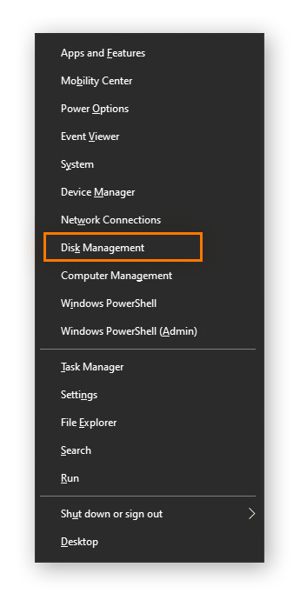
Connect your external drive to your PC via a USB port. Then, press the Windows key + X and select Disk Management.
-
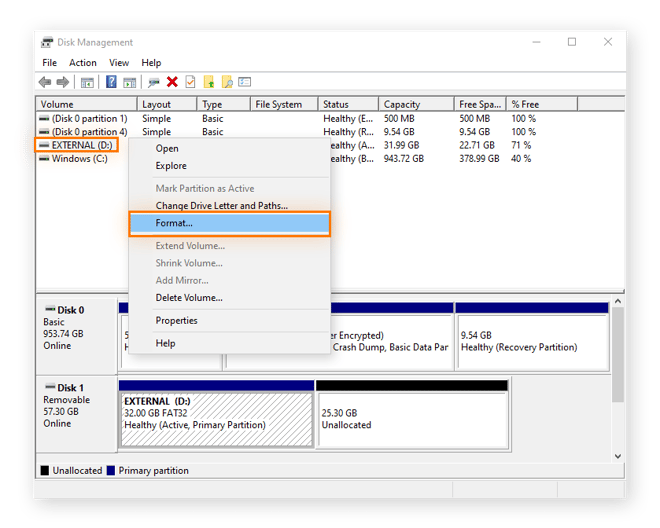
Right-click the drive you’d like to wipe and select Format. Choose a new file system.
Initializing a disk in Disk Management
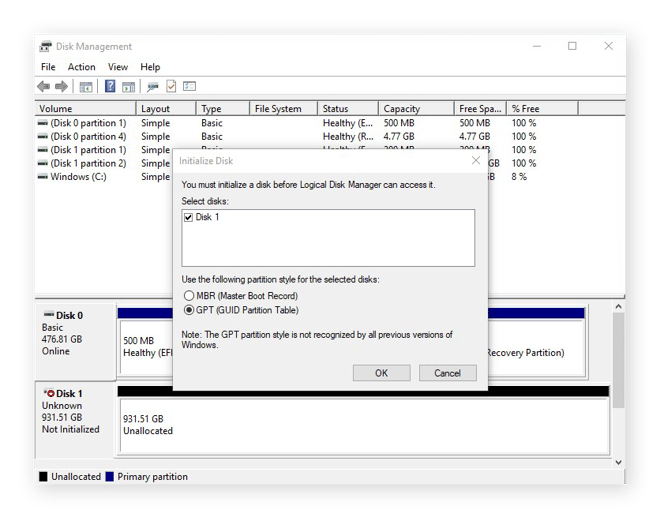
If the drive you’d like to wipe can’t be formatted, you may need to initialize it. Initializing a drive will wipe the drive and reformat it for Windows.
-
Right-click the disk and select Initialize. Select GPT and click OK.
-
Now you can format the disk using Disk Management as described above. Choose the NFTS format to use the disk with Windows.
Reset your PC
Resetting your PC on Windows 11 and 10 wipes all your programs and data, then reinstalls Windows. It’s a good way to give your PC a fresh start if something isn’t working right, or if you’re going to get rid of it. Here’s how to reset your PC in Windows 11 and 10.
How to reset your PC in Windows 11
-
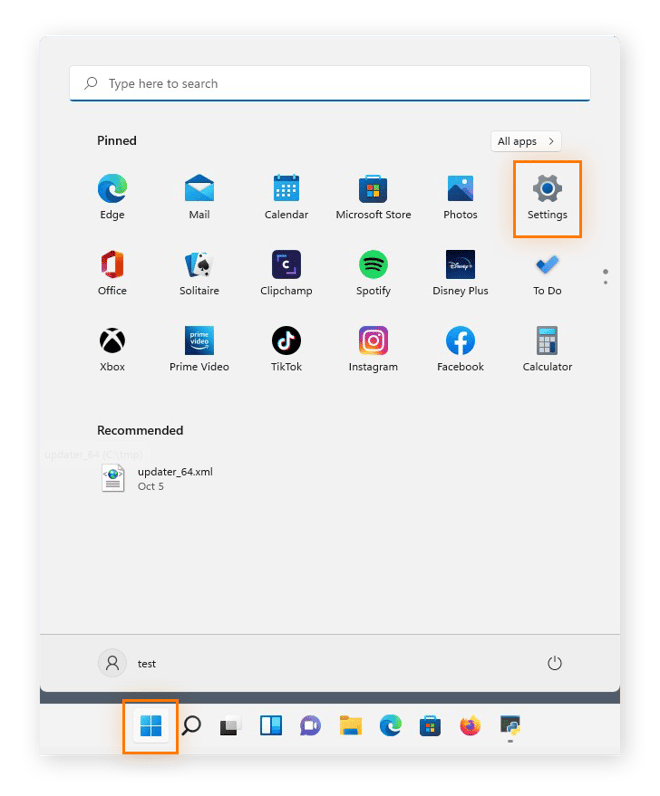
Open the Start menu and select Settings.
-
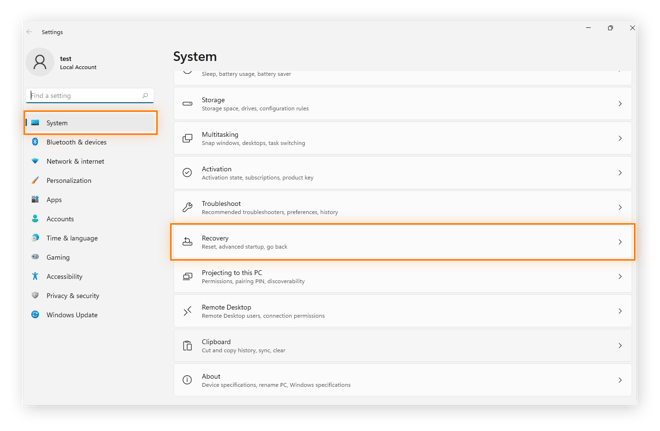
Choose the System category from the menu on the left, then scroll down and select Recovery.
-
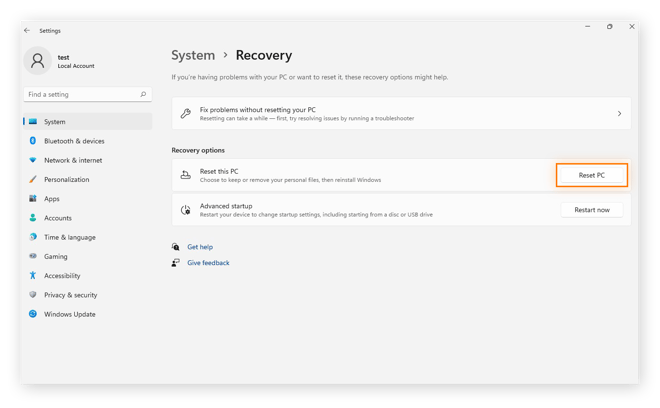
Click Reset PC.
-
Select Remove everything.

-
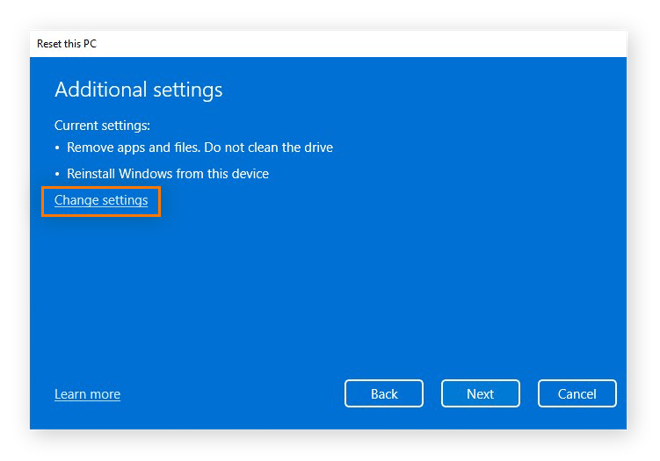
Choose how you’d like to reinstall Windows, then click Change settings.
-
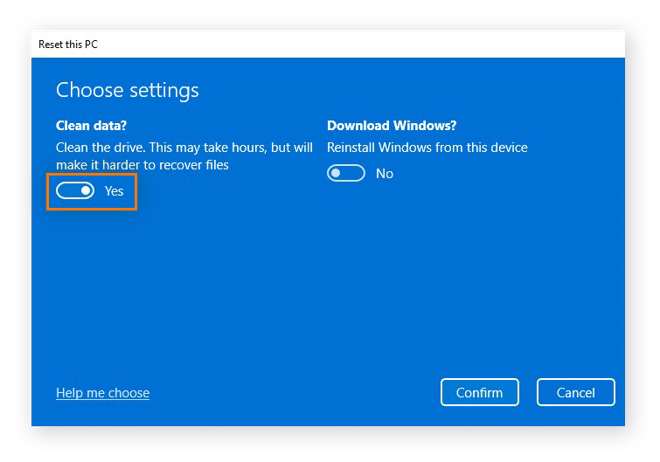
Switch the Clean data? toggle to On, then press Confirm.
-
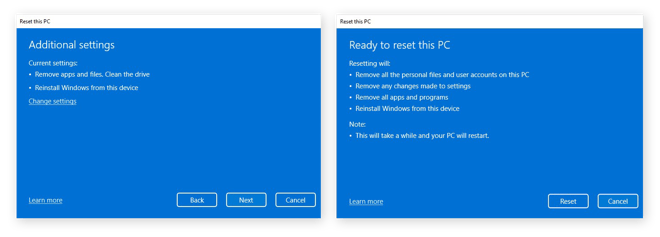
Click Next, then click Reset to wipe your hard drive.
How to reset your PC in Windows 10
-
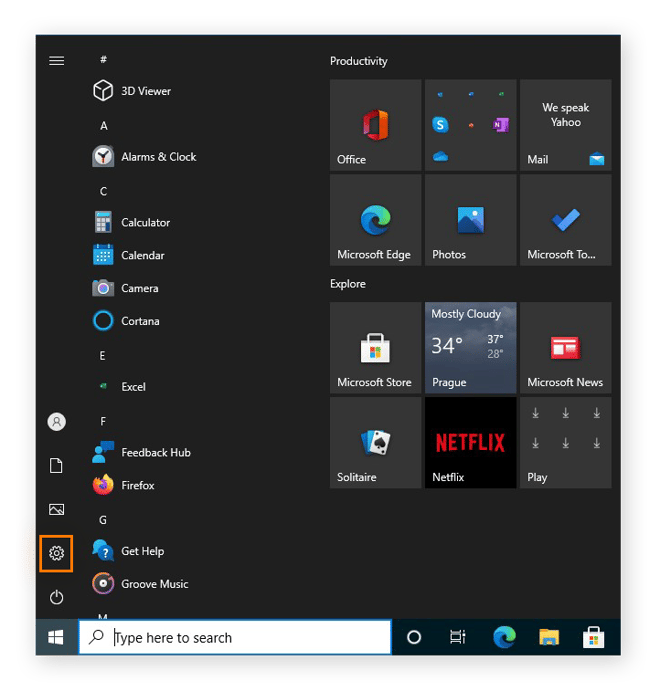
Open the Settings from the Start menu.
-
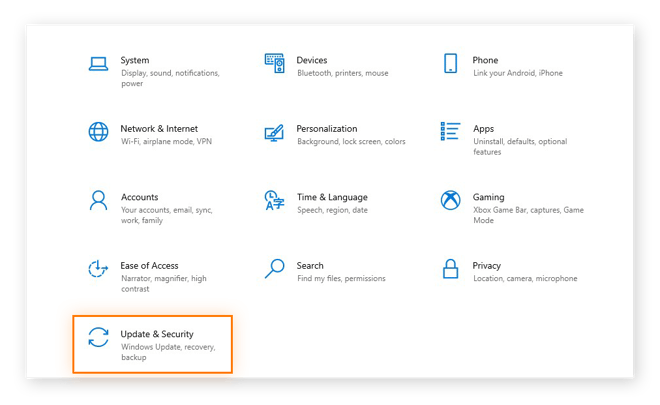
Click Update & Security.
-
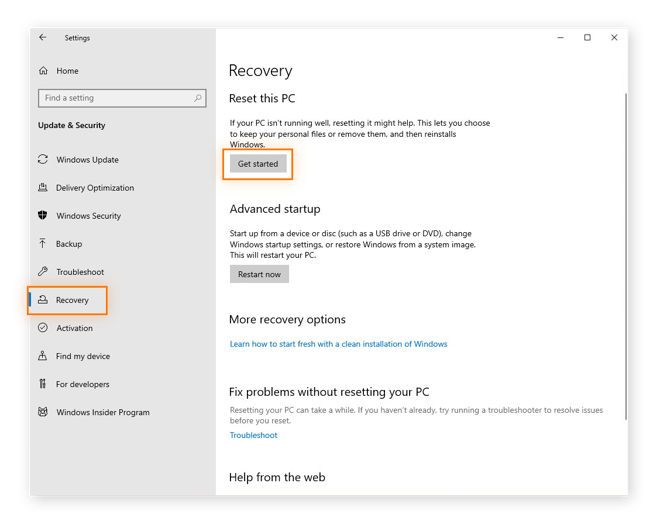
Click Recovery on the left-side menu, then click Get started under Reset this PC.
-
Click Remove everything.

-
Select an option for reinstalling Windows, then click Change settings on the next screen.

-
Flip the Clean data? toggle to On. Then, click Confirm.

-
Click Next, then click Reset to reset your Windows 10 PC.

Third-party software tools
Specialized data sanitization software can scrub your hard drive clean, and some of the best data destruction tools are free. Here are a few data wiping apps you can try:
-
DBAN
DBAN is a popular and free data wipe tool, but it only works on hard disk drives. If you have a solid state drive, DBAN isn’t the right solution for you. But since it works from outside your operating system (OS), you can use it to wipe your entire machine.
-
CCleaner
A longtime player in the file management space, CCleaner’s free version will give your PC a thorough scrubbing. But to fully wipe your data, you’ll need to opt for the premium version. CCleaner is installed on your computer, so it can’t wipe the drive hosting your OS.
-
CBL Data Shredder
Use CBL Data Shredder from a CD or USB drive to wipe your entire drive, or install it and wipe parts of your PC.
If you’re not ready to completely wipe your hard drive using one of the tools above, first check out our essential guide on how to clean your PC — we’ll guide you through a complete cleanup to optimize your PC performance before you decide to erase your data.
How to wipe a hard drive in macOS
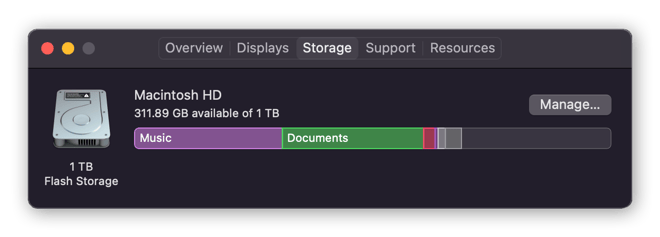
The process for wiping your hard drive on a Mac depends on whether you have a hard disk drive (HDD) or an SSD. To find out what’s in your Mac, click the Apple icon, then click About this Mac. In the window that opens up, navigate to the storage tab. In this example, our Mac has a 1 TB SSD (referred to as “Flash Storage”).
Back up your data
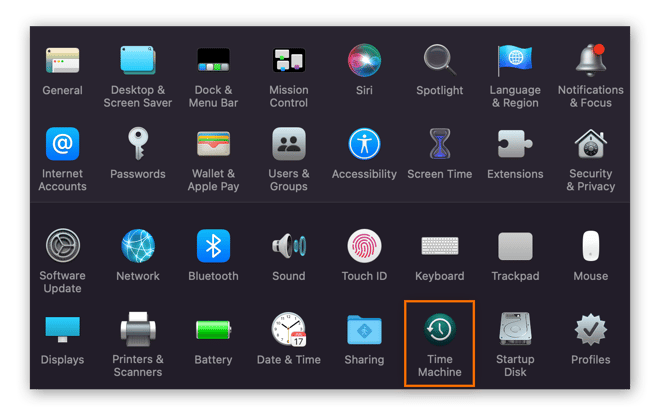
Before wiping your drive, manually back up your data to an external storage device or to a cloud storage solution. You can also use Apple’s built-in Time Machine utility to back up your computer. You’ll find it in your System Preferences.
How to wipe a Mac with an Intel processor
-
Turn your Mac off. Then, press the power button and immediately hold down the Command + R keys until you see the Apple logo.
-
Select Disk Utility from the options shown to you.
-
Click Erase and choose a file system.
-
Click Security Options if it’s available, then move the slider all the way to the right for the most secure option. If you don’t see Security Options, it means that Disk Utility can’t securely wipe your drive.
-
Select Erase, then click Done.
How to wipe a Mac with an M1 chip
-
Turn your Mac off. Then, press and hold the power button until you see the Startup Options window. Choose Options and Continue.
-
Click Disk Utility in the next window.
-
Choose your Macintosh HD from the side menu.
-
Click Erase and choose a file system for your drive, then click Erase Volume Group.
How to wipe a Mac with an SSD
Disk Utility won’t let you securely wipe an SSD. Instead, Apple encourages you to use the FileVault utility, which encrypts your drive to prevent anyone else from accessing the data on it. To turn on FileVault encryption, click Security & Privacy from your System Preferences, then click the FileVault tab.
If you don’t choose to manage your FileVault encryption via your iCloud account, keep your recovery key safe.
 Instead of wiping your drive, you can encrypt it, and then delete the FileVault key. Here’s how:
-
After using FileVault to encrypt your SSD, restart your Mac into Recovery mode using the procedures described above for either an Intel or M1 chip.
-
Open Disk Utility, select your drive, then click Unlock.
-
Erase your now-unlocked drive — this will delete your FileVault key and render the data on the drive unrecoverable.
Optimize your drive with Avast Cleanup
Wiping a drive is an effective security measure, but it’s also important to keep your drive clean while you’re still using it. A clean hard drive runs faster — and Avast Cleanup can handle it all automatically. Delete junk files and bloatware, snooze resource-hungry apps, and maximize the performance of your computer.