6 ways to permanently delete files from your PC
There are many ways to delete a file, and they don’t all produce the same end result. You might just need to free up PC disk space and don’t mind if files are recoverable. Or, if you’re selling your PC, you might want to remove a file completely so that it’s permanently unrecoverable.
Here are six ways to delete files on Windows PC — some more permanent than others:
1. Use the right-click menu to delete files
This method will send your file to the Windows Recycle Bin, where it will remain until you either recover it or empty the Recycle Bin, deleting the files permanently. This is an easy option, especially if your keyboard isn’t working and you can’t use Command Prompt or other keyboard shortcuts to delete files. Here’s how to do it:
-
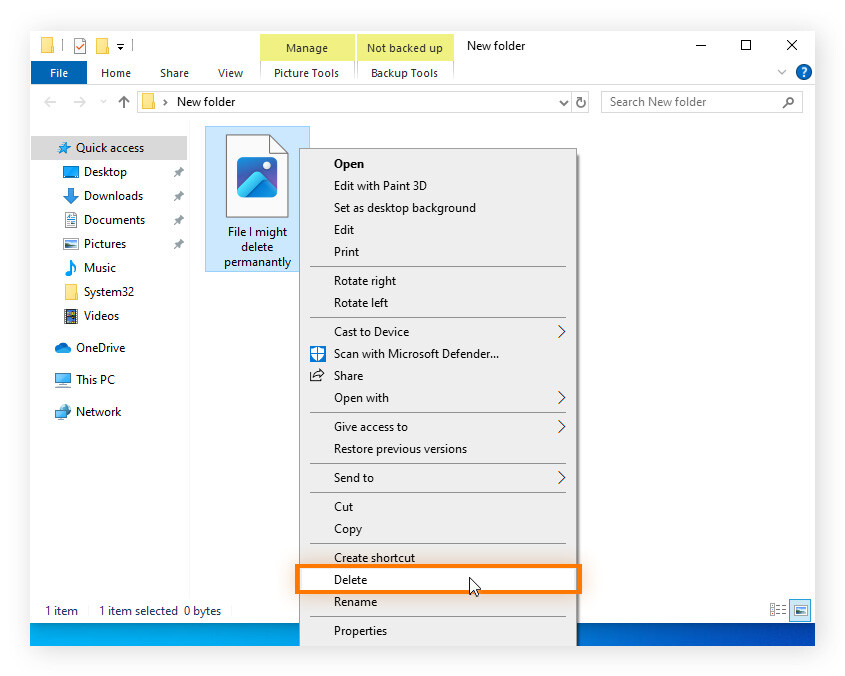
Right-click the file you want to send to the Recycle Bin and click Delete.
-
If you want to permanently delete this file, open the Recycle Bin, select the file you want to delete permanently, then click Empty Recycle Bin.
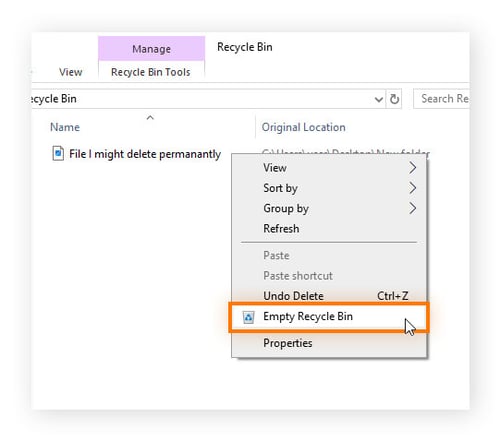
If you change your mind after sending a file to the Recycle Bin, you can select Undo Delete to restore the file to its original location. But once you empty the Recycle Bin and delete the file, it’s much harder to recover, and sometimes impossible.
2. Use Keyboard shortcuts to permanently delete files
Here’s how you can skip the Recycle Bin and delete files even if your mouse is not working. To permanently delete files using Windows keyboard shortcuts, follow these steps:
-
Open File Explorer by holding down the Windows + E keys simultaneously. Hit Tab until the cursor moves to the Search text box. Type the name of the file and hit Enter.
-
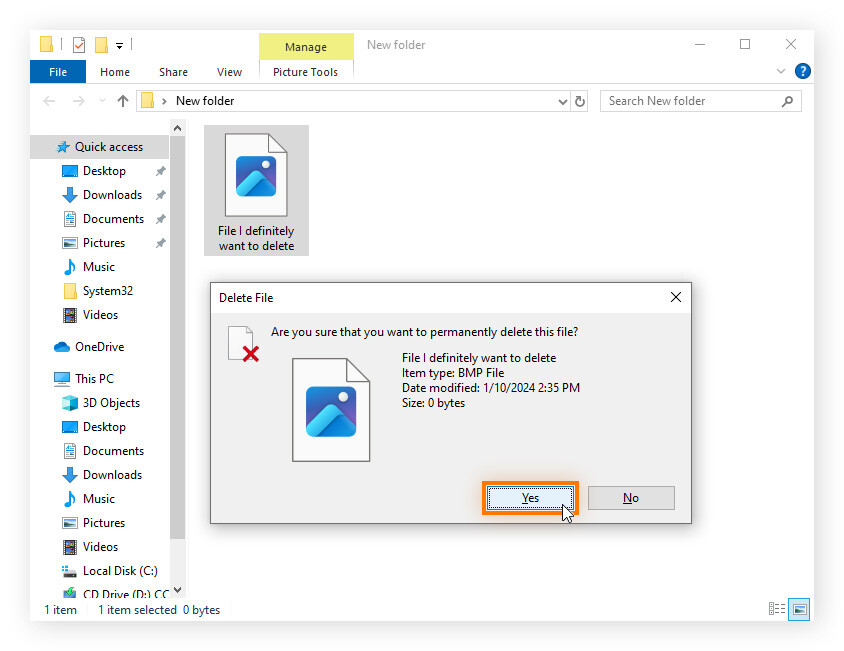
Select the file using the arrow on the keyboard. Then hold Shift and press Delete.
-
Select Yes on the prompt that appears
Deleting a file in this manner may not work if the file is still in use by a program when you try to delete it, or if you’re not authorized to delete the file.
3. Use the File Explorer Ribbon to delete files
File Explorer is the default file browser in Windows that lets you view, manage, and access all the files and folders that you have stored on your computer. The File Explorer Ribbon houses all the different tabs and options toward the top of the window.
You can easily delete files or folders at any location in your file system using the File Explorer Ribbon by following these simple instructions:
-
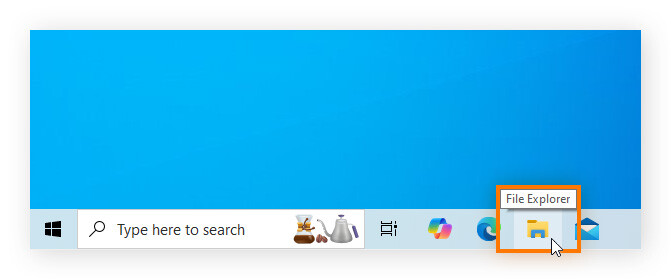
Open File Explorer by clicking the folder icon on the Windows taskbar.
-
Navigate to the directory where the file or folder you want to delete is located.
-
While ensuring the Home tab in the top-left corner of the window is open, select the file you want to delete.
-
Find the Delete option toward the top of the window, open the drop-down menu and select Permanently delete to delete the file. Click Yes when prompted, or select Recycle to send the file to the Recycle Bin.

Note that If the File Explorer Ribbon is not appearing at the top of the window, hold the Ctrl + F1 keys simultaneously to toggle its visibility.
4. Use PowerShell to delete files
Windows PowerShell is a command line shell and scripting language that can be used to automate tasks and simplify configuration of the Windows operating system. More advanced users can also use PowerShell to permanently delete files — here’s how to do it:
-
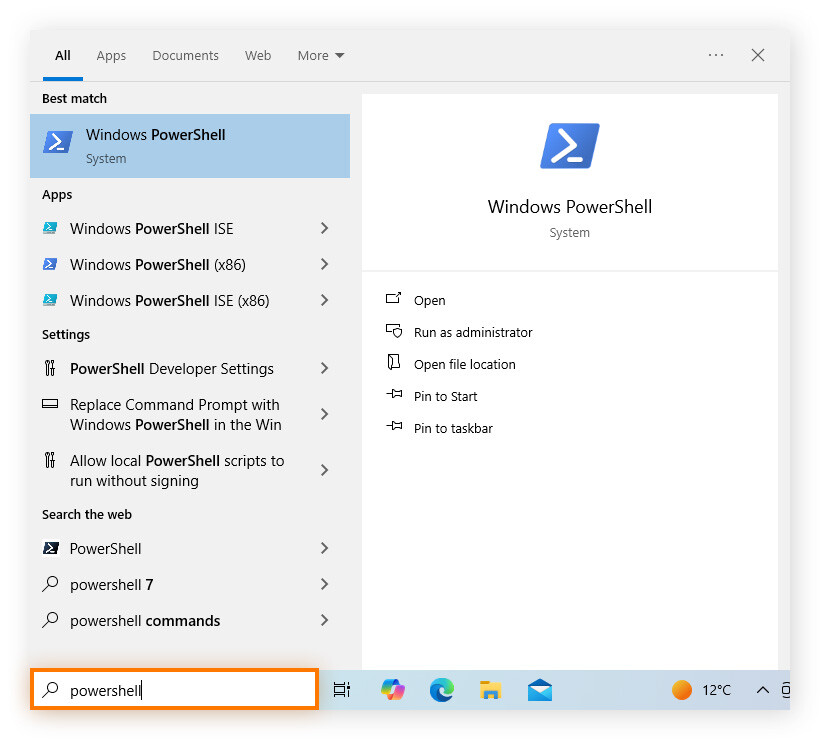
Open PowerShell by typing PowerShell into the search bar, then pressing Enter.
-
Type Remove-Item -path C:\[Filename] and press Enter to permanently delete the file. Keep in mind you need to add the -recurse flag to the command if you want to delete a full directory and everything inside it.

5. Use secure file shredder software
When you delete a file in Windows, the operating system forces itself to forget about it, but the file still technically exists until your system overwrites the same physical location on the hard drive. Recovery of a deleted file is often possible with special software, but only until new data is saved in its location — which, depending on your PC usage, could take anywhere from minutes to months.
If you want to be sure that your files are irreversibly erased, use a specialized file shredder tool that deletes and immediately overwrites the file location on your hard drive. Delete files, folders, or entire drives with the click of a button.
For PUPs, junk files, and other temporary files, install a trusted tune-up tool like Avast Cleanup. Avast Cleanup optimizes your PC’s performance by removing bloatware in bulk and putting resource-draining apps to sleep, ensuring you get the most out of your computer.
6. Use Windows Command Prompt
If other methods are failing to delete a file, you can always try the del command when using Windows Command Prompt. Here’s how you can use this command to delete potentially unwanted files and old files:
-
Open Command Prompt by holding the Windows + R keys simultaneously, then type cmd and press Enter.
-
Once Command Prompt is open, use the command del /F C:\[Filename]. The inclusion of /F forces the deletion of the file even if the read-only attribute is set.

Note that if you want to remove a directory and all its contents, you need to use the rmdir command with the /S flag followed by the directory’s location.
What happens to files when you delete them on Windows?
Generally, when you delete a file it goes to the Recycle Bin, where the file then waits for you to either delete it permanently (by emptying the Recycle Bin) or restore it to the original location. When you delete a file, Windows doesn’t immediately overwrite the storage space — instead, the data remains until the space is overwritten with new data.
Deleting a file on macOS is much the same. You can send a file to Trash and permanently delete or restore it from there, or you can bypass Trash and permanently delete it right away. Keep your Mac clean of unwanted files and bloatware with a trusted Mac cleaner to keep it running at optimum performance.
Let’s take a closer look at the differences between what happens when you delete data from SSDs and HDDs. To find out what kind of storage device you have, hit the Windows key, type Device Manager, and press Enter. Expand Disk drives and double-click your disk to check what type of disk you have.
Hard disk drive (HDD)
When a file is stored on an HDD, it’s stored on contiguous blocks where each section of a file’s data is physically located next to the previous piece of the file’s data. When you delete a file that’s stored on an HDD, the operating system acts as if the file’s data no longer exists. This data can stay around until the physical location is overwritten with new data, such as when you defragment your HDD to improve the drive’s performance.
Solid-state drive SSD
Solid-state drives (SSDs) store data differently than traditional hard drives. Instead of using contiguous blocks, data is distributed across the drive using a technique known as “wear leveling,” which helps to increase the lifespan of the SSD.
When you delete a file stored on an SSD, the operating system recognizes that the file is gone, but the SSD itself remains unaware until it receives a TRIM command from the OS, or until the OS writes new data to the same logical address (the SDD version of an HDD’s “location”).
Since SSDs can only erase whole blocks at a time, any valid data residing within the same block must be moved to a new location, leaving only the invalid data behind. Once this is done, the block can be erased during the garbage collection process.
How to overwrite deleted files immediately
SDelete (also called SecureDelete) is a command line utility that’s part of the Microsoft SysInternals suite. You can use SDelete to delete a file and then overwrite the same physical location the file was stored in with zeros.
Here’s how to use the SDelete program to overwrite deleted file locations immediately:
-
Download SDelete from Microsoft and extract the contents of the zip folder.
-
Open Command Prompt by typing cmd into the search bar, and pressing Enter.
-
Type the command C:\[Path\to\SDelete\]sdelete.exe -p 5 [filename], filling in the actual file name you want to delete and overwrite.
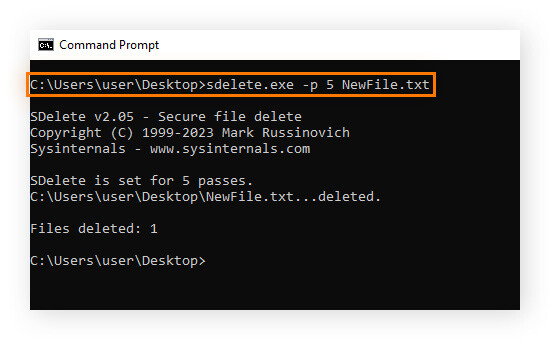
Note that the -p [number] portion of the command lets you specify the number of times the physical storage location gets overwritten with zeros, with more overwrites making data recovery more difficult. In the example above, we used the number 5, meaning the data was overwritten 5 times.
Dangers of temporarily deleting a file
When you delete a file without immediately overwriting the space it occupied, you’re only temporarily deleting it. Anyone with access to the drive can restore the file, and interact with it as normal before it’s actually overwritten.
If you’re looking to keep certain bits of information more private, such as credit card or banking information, passwords, and other documents that people can use to steal your identity, then you need to make sure these files are permanently deleted and wiped from your drive. While temporarily deleting a file can still be useful in case you need to restore something, you shouldn’t think of it as actually removing the file from your computer.
You can ensure that your data doesn’t linger by using a file shredder tool. Data shredders like this are especially good for wiping temporary files, where important info like credit card numbers might get stored, and making sure deleted files can’t be recovered.
Delete unwanted files and programs with Avast Cleanup
Deleting files, especially temporary files and unwanted programs, can be tedious. Avast Cleanup helps you optimize your computer’s performance by clearing bloatware and other unwanted programs, deleting temporary and unnecessary files that slow things down, putting unused apps to sleep, and keeping your software up to date. Try it for free today.


