- Security
- Privacy
- Performance
When your iPhone won’t connect to Wi-Fi, the disruption can be exasperating. Our guide will walk you through expert troubleshooting tips to help you learn why your iPhone or iPad won’t connect to the internet and how to fix your settings. Then, get a powerful VPN to help keep all your internet data secured on wireless networks.
.png)

There are several ways to fix an iPhone that won’t connect to the internet — including restarting your iOS device, restarting your router, and resetting your phone completely. You can also use these solutions if your iPad is not connecting to Wi-Fi. And many of these tips can help you fix a poor Wi-Fi connection on Android, too.
Here are the best ways to fix Wi-Fi connection problems on an iPhone or iPad:
The quickest and easiest potential fix for a Wi-Fi connection issue is to restart your iPhone or iPad. Restarting your iOS device reboots apps, helps clean up your iPhone, and repairs issues that might be disrupting your internet connection like corrupt network data.
Here’s how to restart your iPhone:
Simultaneously press and hold the power button on the right side of your iPhone and the volume down button on the left side until the power-off slider appears.
Drag the slider from left to right to power off your device.
Turn your iPhone back on by holding the power button until the Apple logo appears.
These steps will work for newer models such as iPhone 13, 14, 15, and 16 devices. If you have an older model such as an iPhone 12 or SE, the process might be slightly different. Check the Apple Support page for instructions that suit your specific iPhone model.
Here’s how to restart your iPad:
Simultaneously press and hold the power button and either volume button until the power-off slider appears.
Drag the slider from left to right to power off your device.
Turn your iPad back on by holding the Top button again until the Apple logo appears.
These steps apply to models with no Home button. If your iPad has a Home button, you may only need to hold the Top button to restart it.
Removing your iPhone case may help resolve Wi-Fi connectivity issues by reducing signal interference. Bulky or metallic cases, in particular, can weaken reception by obstructing your device’s antennas. If your Wi-Fi is slow or unstable, try removing your phone case and reconnecting to the network to see if your signal improves.
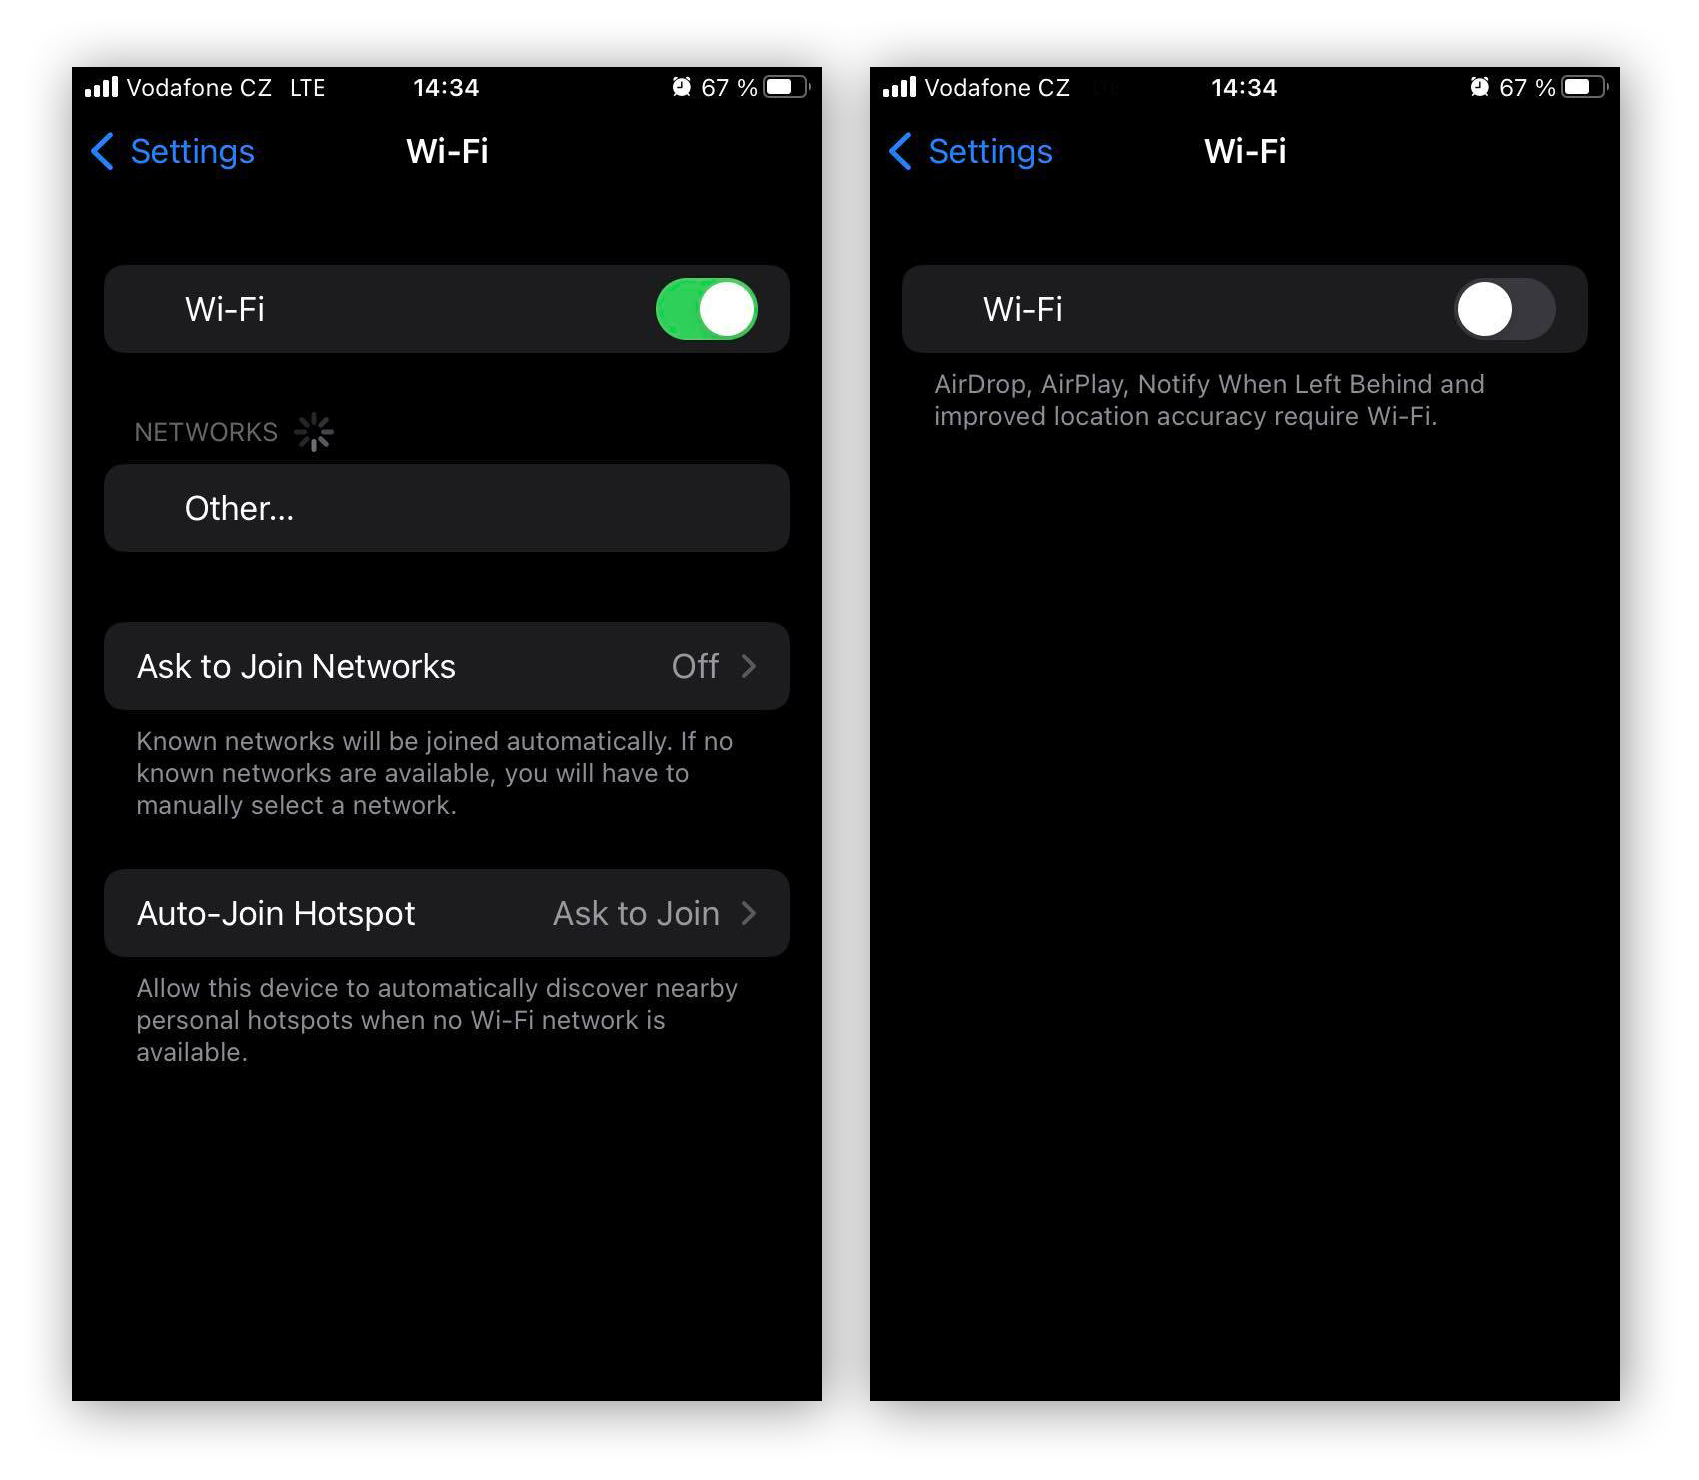
When troubleshooting Wi-Fi connection issues on your iPhone or iPad, check that your Wi-Fi is switched on:
Go to Settings > Wi-Fi on your device.
Make sure the toggle next to Wi-Fi is turned On.
If the Wi-Fi toggle is turned on, turn it off and then turn it back on again.
If your phone detects a problem when you try to connect to a network, the issue will often show up under the Wi-Fi network's name with the alert No Internet Connection. For detailed information about the issue, tap the Wi-Fi network name.
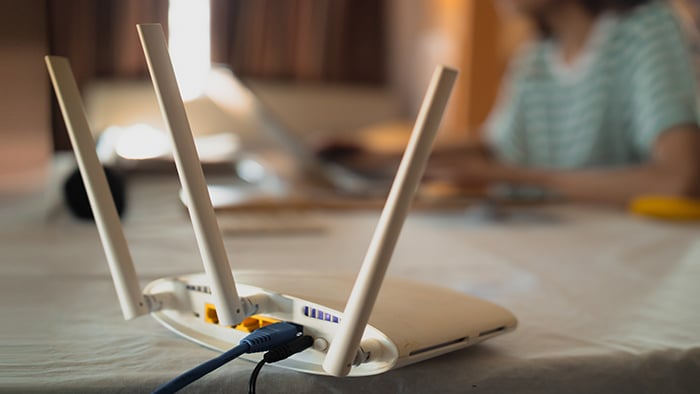
If you’re only experiencing Wi-Fi issues at home, your router may be the cause. Try moving closer to your router or repositioning it to a more central location. If that doesn’t help, try connecting another device to the Wi-Fi network. If the other device also can’t get online, the issue is likely with your router itself.
To troubleshoot your router, make sure all cables are securely connected, then restart the router by turning it off, waiting 30 seconds, and turning it back on. If you still can’t connect, contact your internet service provider or try resetting the router to factory settings.
Wi-Fi connection issues are often due to device settings, such as Airplane Mode or parental controls being enabled. Check the following network settings and adjust them as needed to restore connectivity.
Airplane Mode disables all network connections — including Wi-Fi — preventing you from connecting to any network. If you recently traveled, went to a movie, or used this setting to preserve your battery, there’s a chance Airplane mode is still turned on.
To quickly check if Airplane Mode is turned on, open your phone’s Control Center by swiping down from the top right of your phone. If the airplane icon is highlighted, tap it to turn off Airplane Mode.
Here’s how to use Settings to check Airplane Mode on your iPhone or iPad:
Go to Settings > Airplane Mode.
Next to the Airplane Mode setting, toggle the switch to Off.
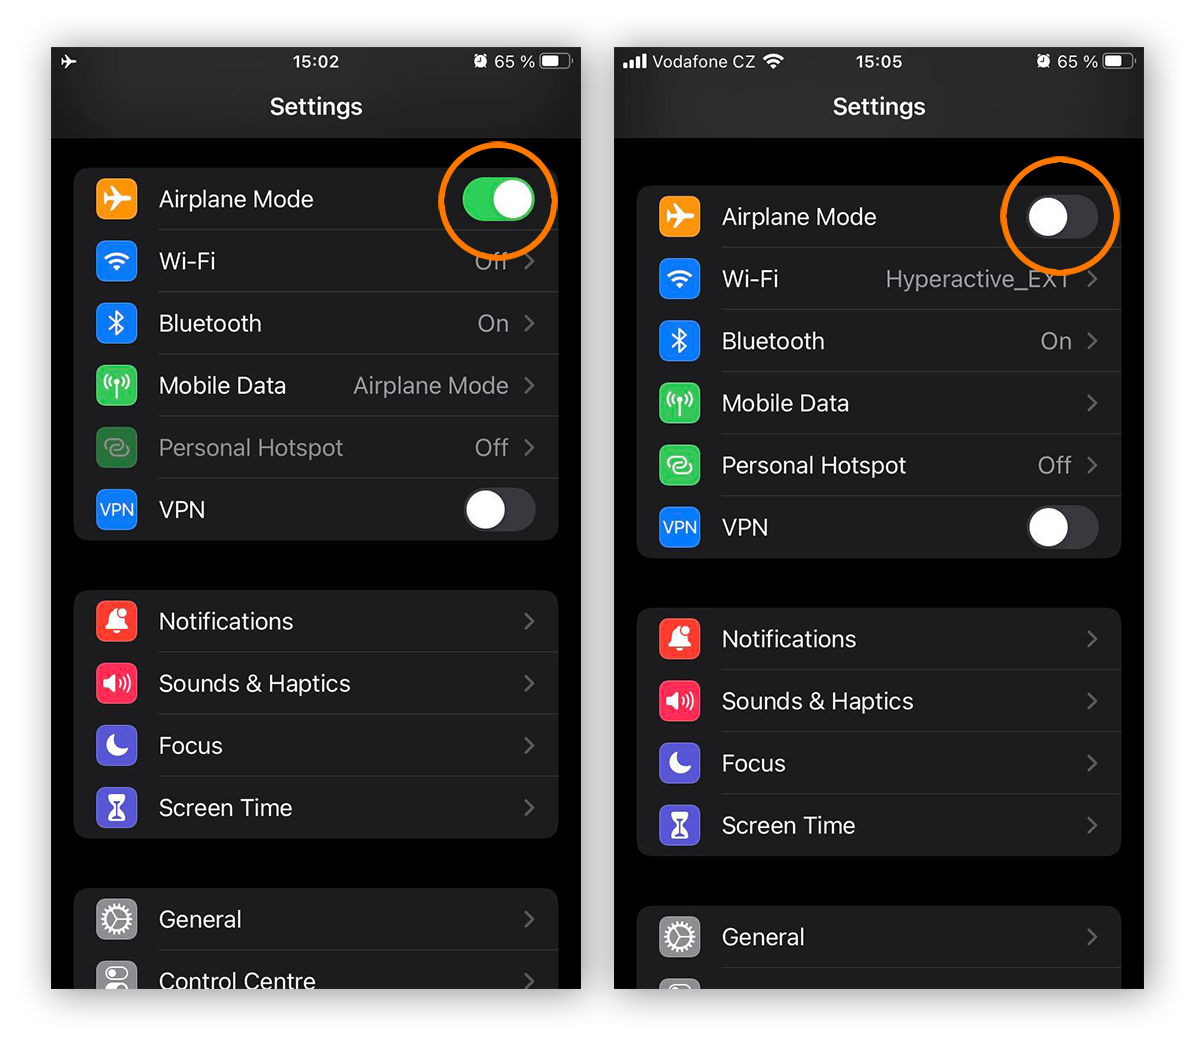
Even if Airplane Mode is already disabled, turning it on and switching it back off again may fix your Wi-Fi connection issue. Sometimes, it can even help speed up your iOS internet connection by having your iPhone re-sync with your Wi-Fi network.
Forgetting and reconnecting to a Wi-Fi network can resolve connection issues by clearing stored network settings, including outdated credentials or misconfigured settings. This forces your device to establish a fresh connection, often fixing authentication errors or IP conflicts.
Here’s how to forget a Wi-Fi network on your iPhone or iPad:
Go to Settings > Wi-Fi.
Tap the information icon next to the network you want to forget.
Select Forget This Network and tap Forget to confirm.
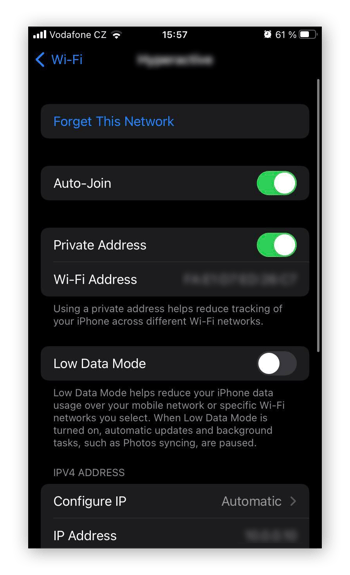
Go back to Settings > Wi-Fi and select the Wi-Fi network to reconnect to it.
Content, privacy, and screen time settings can impact internet access and browsing features. Commonly used as parental controls on iPhones and iPads, these settings help manage screen time, block inappropriate content, and limit app usage to create a safer browsing experience for children.
If you previously tested these controls or inherited an old device with these settings turned on, they might be blocking apps or websites.
Here’s how to check Content & Privacy Restrictions on your iPhone or iPad:
Go to Settings > Screen Time > Content & Privacy Restrictions.

Check if the On/Off toggle is switched on. To turn off all restrictions, toggle the switch to Off.

To fix your Wi-Fi connection issues, you may have to restore your iPhone or iPad location services and network settings. If the problem persists, you can consider a full device reset that restores default factory settings.
While generally useful, Wi-Fi networking location settings might also be the reason your iPad or iPhone isn’t connecting to Wi-Fi. Turning off Location Services on iOS to refresh your location-based network settings can help resolve Wi-Fi issues causing weak signal or connection difficulties.
Here’s how to turn off Wi-Fi networking Location Services on your iOS device:
Go to Settings > Privacy & Security > Location Services.
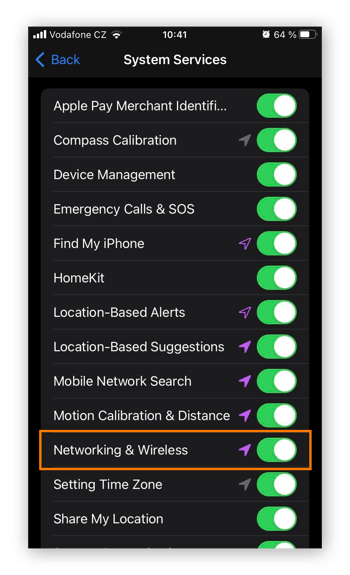
Scroll to System Services.
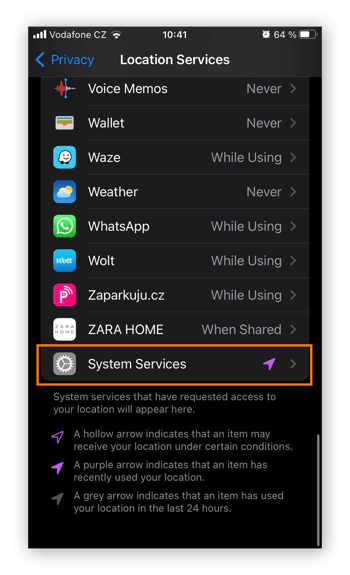
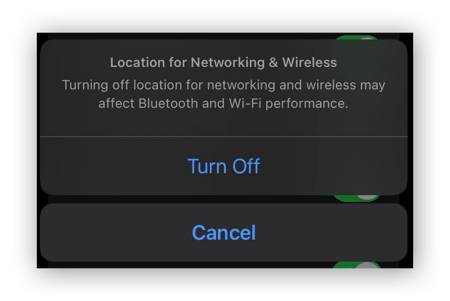
Toggle off the switch next to Networking & Wireless and tap Turn Off to confirm.
Your iPhone or iPad uses Location Services to help apps and websites determine your location for directions and local information. Google also uses your location and other data to provide personalized experiences and relevant content.
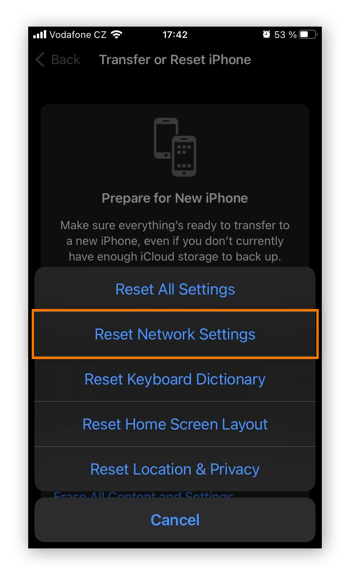
Here’s how to reset network settings on your iPhone or iPad:
Go to Settings > General > Transfer or Reset iPhone/iPad > Reset.
Tap Reset Network Settings, enter your passcode (if needed), and tap Reset Network Settings again to confirm.
Once your device finishes resetting and restarts, go to Settings > Wi-Fi to rejoin the Wi-Fi network.
If nothing else has fixed your iPhone or iPad’s Wi-Fi connection, your last resort may be to perform a factory reset. This will erase everything on your device, including contacts, photos, personal data, and customized settings, restoring all data to the original factory state.
Before performing a factory reset, make sure to back up the data you want to keep. Since you don’t have access to Wi-Fi, you’ll need to either create a cloud backup using mobile data or connect your computer to a USB-C cable and complete the backup using iTunes. Be careful with the former option if your carrier charges for data usage, as creating a backup can be data intensive.
Here’s how to reset your iPhone or iPad back to its factory settings:
Go to Settings > General > Transfer or Reset iPhone/iPad.
Tap Erase All Content and Settings, then tap Continue.
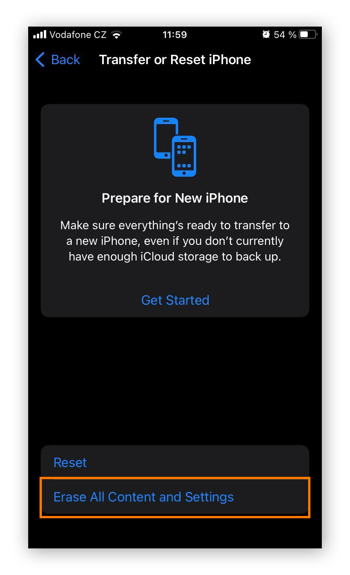
Enter your passcode if prompted, enter your Apple ID password, then tap Turn Off to disable Find My and Activation Lock.
Tap Erase iPhone/iPad.
After resetting your device, you can set it up as new or restore your data from a backup. Restoring is more convenient since it brings back your settings, apps, and contacts, but it may also reintroduce the issue that prevented you from connecting to Wi-Fi.
If none of the solutions above have helped fix your Wi-Fi on your iOS device, the issue may be with the hardware itself. In that case, contact Apple Support to help diagnose and resolve the problem.
The most common reasons why your iPhone or iPad won’t connect to Wi-Fi include a poor connection signal, an incorrect Wi-Fi password, your Wi-Fi or mobile data settings, restricted network settings, or even a bulky phone case. A weak Wi-Fi connection can also be a signal that you need to increase your internet speed.
Here are some of the most common reasons you might be unable to connect to Wi-Fi:
You’re too far away from your router: Network signal strength tends to get weaker as you get further away from your router or modem. Your iPhone or iPad may not connect to the Wi-Fi at all if you’re in a different room or too far from the wireless access point.
You’re using the wrong Wi-Fi password: If your iPhone won’t accept the Wi-Fi password, check to make sure you’re using the latest password and typing it properly. Even wrongly capitalized letters will stop the password from working.
Your Wi-Fi network settings are turned off: Check your iPhone settings to make sure Wi-Fi is turned on before trying to connect to a Wi-Fi network. You can also turn on the Auto-Join setting to ensure your iOS device connects to trusted networks automatically.
Your network or parental control settings are preventing connection: There are several parental control settings, such as Screen Time controls, App Limits, and the Downtime tool, that can affect an iPhone’s Wi-Fi capability. Similarly, your network settings may also be preventing a proper Wi-Fi connection.
Your iPhone or iPad case is causing signal issues: While uncommon, some large iPhone or iPad cases can block or weaken a Wi-Fi network signal. If you’re having trouble connecting to Wi-Fi, try removing your case.
You have a damaged network component: Sometimes, your iOS device won’t connect to Wi-Fi because there’s something wrong with the router. Check your connection on other devices to rule out hardware component issues.
Your internet is being throttled: Throttling occurs when your internet service provider restricts your internet bandwidth or speed to manage network congestion or enforce data limits. Contact your ISP to resolve this issue.
Your iPad may not be connecting to Wi-Fi for a variety of reasons, including because it’s too far away from the router, the wrong Wi-Fi password is being used, or it has damaged network components. iPads run on a specific iPadOS which is very similar to an iPhone iOS, meaning the process to troubleshoot and fix any connection issues are similar.
To help prevent future Wi-Fi issues, keep your iPhone updated and free of clutter, use a high-quality router, and enable auto-connect for trusted networks. Regularly restart your device and router, reset network settings if needed, and minimize interference from other electronics for a stable, reliable connection.
One of the most effective ways to reduce the chance of Wi-Fi connection problems on your iOS device is to keep it cleaned up and free from digital clutter. A device with ample storage and optimized performance runs smoother and faster, which can help maintain a stable Wi-Fi connection.
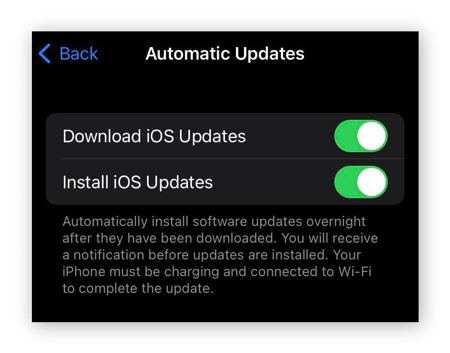
Apple provides regular updates for problems that might stop your iOS device from connecting to Wi-Fi. System updates also include critical security patches that help prevent malware and increase your device’s cybersecurity protection.
To turn on automatic updates in iOS, go to Settings > General > Software Updates. Then tap Automatic Updates to adjust your settings.
Budget routers can be unreliable, with a weak or unstable signal. Investing in a high-quality router means that your Wi-Fi is less likely to disconnect randomly, especially if you have a lot of devices on your home network.
Routers from trusted providers, such as your internet service provider, are also typically updated with relevant firmware that helps to avoid compatibility issues with newer devices and keeps your network secure. It’s also a good idea to turn your router on and off regularly to clear your router’s cache and trigger firmware updates.
Place your router in a central location, away from electrical appliances like microwaves and cordless phones that can cause interference. While it may not be the most visually appealing device, hiding it behind furniture can weaken the signal. If you're connecting to a trusted network outside your home, try positioning yourself closer to the router for a stronger connection.
Once you join a Wi-Fi network, you can enable the network setting to automatically connect in the future. This means you won’t need to enter a password again unless it’s changed or the connection is reset. Go to Settings > Wi-Fi, then tap the network name and toggle Auto-Join on.
You can also enable iCloud Keychain syncing, which allows Wi-Fi passwords to be shared between your Apple devices. To do this, go to Settings > tap your name > iCloud > Passwords (or Passwords and Keychain) > tap Sync.
Only connect automatically to networks that you trust; do not enable this feature for unsecured, open networks.
Whether you're at home or using public Wi-Fi in a cafe, Avast SecureLine VPN helps keep your connection safe and private, blocking hackers and prying eyes while connecting you to fast global servers for seamless access to your favorite content. Don’t let security threats or restrictions slow you down — secure your connection with Avast.