- Security
- Privacy
- Performance
Think testing performance on your Mac sounds like a job for the IT department? Think again. Learn how to run diagnostics and speed tests like an expert to make sure you're getting the most out of your Mac. Plus, find out how a cleanup and performance optimization tool can help supercharge your Mac and keep it running at peak performance.
.png)


This Article Contains
This Article Contains
How to run a diagnostic on a Mac
All Macs include the Apple Diagnostics tool — including MacBook Air, MacBook Pro, and iMac devices — and you can use the tool to perform a computer health check to identify hardware issues on your Mac. If there’s an issue, the tool suggests possible solutions and shows you how to get assistance from Apple Support.
Apple Diagnostics runs differently depending on the type of Mac you have. For example, Macs with Apple Silicon (currently using M1, M2, or M3 chips) are a bit different than Macs with Intel chips.
In the following sections, find step-by-step guides on how to run diagnostics on a MacBook Air or Pro, or an iMac with an Apple Silicon or Intel processor.
How to run Apple Diagnostics on a Mac with an Apple Silicon chip
-
First, shut down your Mac (Apple menu > Shut Down). Next, disconnect all external devices except for your keyboard, mouse, display, and ethernet connection if you have one.
-
Press and hold the power button (Touch ID on laptops) until you see Options (the gear icon).
-
Release the power button, then press the command (⌘) + D keys simultaneously to start Apple Diagnostics. Release the keys when a progress bar appears on screen or you’re asked to choose a language.
-
The results will appear on screen when the test is finished.
-
Write down any reference codes.
-
If you’d like to repeat the test, click Run the test again or press command (⌘) + R.
-
Once you’re finished running Diagnostics, you can restart by clicking Restart or pressing R, or shut down by clicking Shut Down or pressing S.
How to run Apple Diagnostics on a Mac with an Intel processor
-
First, shut down your Mac (Apple menu > Shut Down). Next, disconnect all external devices except for your keyboard, mouse, display, and ethernet connection if you have one.
-
Turn your Mac back on, then immediately press and hold the D key (on some Macs you need to hold option + D).
-
Release the key when you see a progress bar appear on your screen or you’re prompted to select a language.
-
The results will appear on screen when the test is finished.
-
Write down any reference codes.
-
If you’d like to repeat the test, click Run the test again or press command (⌘) + R.
-
Once you’re finished running Diagnostics, you can restart by clicking Restart or pressing R, or shut down by clicking Shut Down or pressing S.
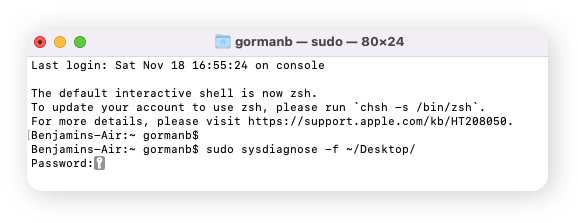
How to run Mac diagnostics from Terminal
You can run a diagnostic test from Terminal on Macs but the results are quite technical — you’ll probably need to run this test only if the Apple Support team requests it to help you with an issue.
-
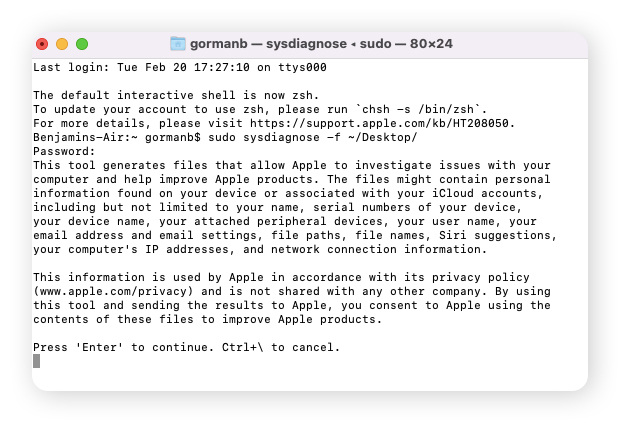
Launch Terminal. Type the command sudo sysdiagnose -f ~/Desktop/ and hit Enter, then type in your password and hit Enter again.
-
When you see the message below appear, hit Enter again to begin the test.
-
Once the diagnostic test is complete, the results will appear on your desktop.
Common Apple Diagnostics codes
Apple Diagnostics will deliver your Mac’s diagnosis in the form of codes. These codes, also known as Apple Hardware Test (AHT) codes or error codes, represent different potential issues with your computer. The only code that doesn’t correlate to a problem is ADP000 (No Issues Found).
Here are a few common Apple Diagnostic codes you may receive and their corresponding diagnoses:
If you receive a different code, visit Apple’s support page about diagnostic reference codes to learn more about your Mac’s issue. Remember to save the code, as it will be helpful if you need to contact Apple Support.
How to run a CPU performance test
There is no built-in software to run a CPU performance test on Macs. Instead, try running a third-party tool like Geekbench. Geekbench is an easy-to-use benchmarking utility that checks the performance of your Mac’s processor under a variety of conditions.
Before you test Mac performance, grab a snapshot of your CPU capacity from the Activity Monitor app. Activity Monitor shows you how much CPU capacity is being used by macOS and any apps you have open.
To launch Activity Monitor, go to Launchpad in the dock and search for Activity Monitor. Click it and select CPU at the top of the window. You’ll see a list of active processes along with the amount of CPU they’re using.
 Activity Monitor displaying CPU data for all active processes.
Check Activity Monitor for your CPU load. You can view this at the bottom of the Activity Monitor screen. Look at the System and User percentages (red and blue numbers). If the combined percentages are near 100%, it means your CPU load is high, which might explain any Apple hardware issues. You can reduce your CPU load by closing apps and updating your Mac.
 Activity Monitor showing your current overall CPU load.
If the CPU load isn’t high and you’re still experiencing issues, you can test Mac performance with Geekbench or another third-party CPU-testing app. You can try Geekbench for free, but after that, you’ll need to buy the full version from the App Store.
Geekbench simulates common application tasks and measures single-core and multi-core processing power. Open the app and click Run CPU benchmark to test your CPU’s performance on everyday tasks, such as checking email, taking a picture, listening to music, or doing a bunch of different tasks simultaneously.
When the macOS speed test is done running, you’ll see the results displayed. It should look like this:
 The first section of the Geekbench 6 performance testing tool results for a MacBook Air.
The most important numbers on this screen are:
-
Single-Core Score: This score represents how fast your Mac performs when a single processing core handles everything.
-
Multi-Core Score: This score represents how fast your Mac performs when pushed to its limits, using multiple processing cores at once.
Geekbench offers more details for single and multi-core performance by providing scores for measures like file compression, navigation, PDF renderer, and text processing. And it lets you compare system performance scores across devices, operating systems, and even processor architectures.
Running a CPU performance test and then comparing your results to other Geekbench benchmark test scores from similar Macs and processors will show you if your Mac's performance is slowing down and how it compares to the latest generation of Macs.
How to run a Mac disk speed test
The easiest way to run a MacBook speed test is with a third-party app like Blackmagic Disk Speed Test. This app (available for free in the App Store) will check the speed of your Mac’s hard drive or solid-state drive (SSD) and show you if your storage can meet the read and write demands of large files.
Here’s how to run a benchmark test for Mac with Blackmagic Disk Speed Test:
-
Launch the app and click Speed Test Start.
-
The app will test Mac speed by writing a test file to the target disk and reading it back. This cycle will repeat until you click Start again to stop the test.
-
If you have multiple hard drives, go to Blackmagic’s settings by opening the File or Stress menus from the toolbar. Select the drive you want to test and click Start to run the test.
The result of this speed test for Macs shows two speedometers, one for write speeds and one for read speeds. Below these, the Will It Work and How Fast panels contain information for video editors about standard video formats, depth, and read/write speeds that the drive can support for each format.
 A screenshot of the Blackmagic speed testing tool taken from their website.
Blackmagic Disk Speed Test is a Mac performance tester that makes it easy to learn how fast your Mac is running, what you can do to improve it, and whether it’s time to consider upgrading your hard drive.
How to run a GPU performance test
Use a third-party app like Geekbench to run a GPU Macintosh performance test. Running a GPU stress test on your Mac is designed to crash or overheat your Mac’s GPU (graphics processing unit) by using the maximum processing power available. That assesses whether it can work well under normal or intense usage.
Running GPU benchmarks on your Mac is an important way to check Mac performance. The GPU plays a vital role in how graphics render and display on your Mac. Without it, you wouldn’t be able to open windows, watch YouTube videos, or see any graphics at all.
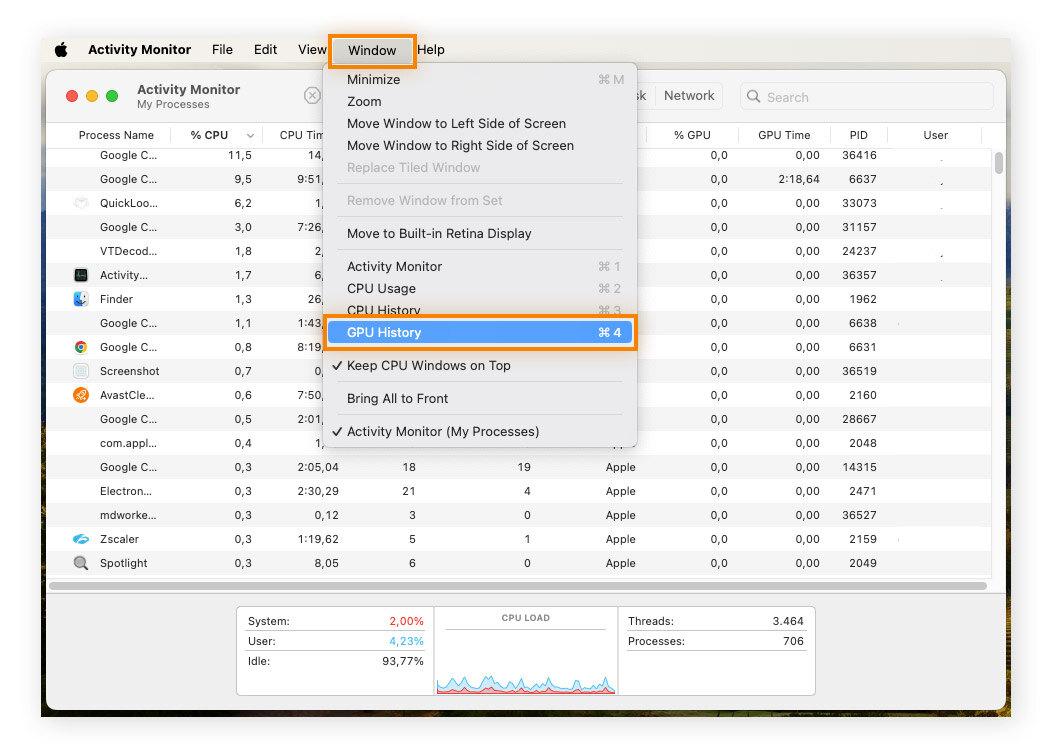
Before running a GPU performance test with a third-party app, view GPU usage using Activity Monitor to see how hard the GPU in your Mac is working. Then, use Geekbench to test your GPU’s potential for gaming, image processing, and video editing.
To view GPU usage in Activity Monitor, click Window, then GPU History.
To test your Mac’s GPU performance with the Geekbench 6 testing tool, select Compute from the left-side menu of the app’s interface and click Run Compute Benchmark.
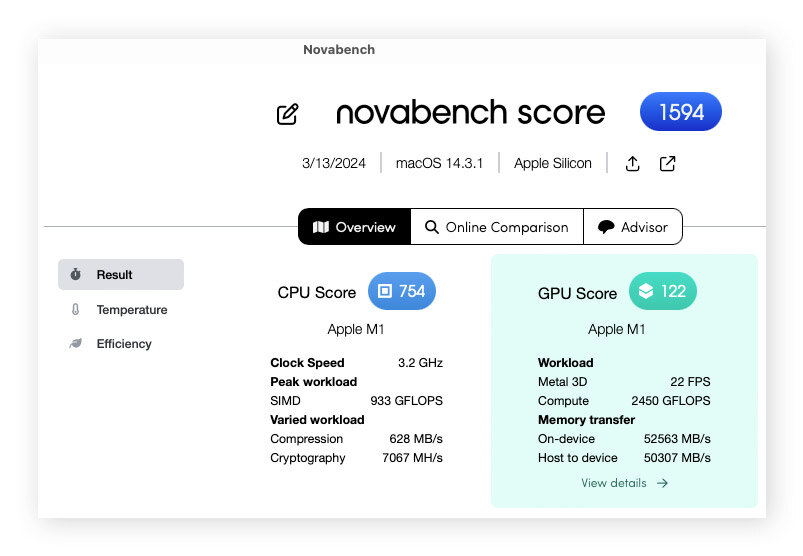
For a free alternative, try Novabench. This tool offers Mac benchmark testing for graphics performance as well as your whole system, including your CPU and RAM.
Here’s how to run a GPU performance test on your Mac with Novabench:
-
Install the app then launch it.
-
Click Start All Benchmark Tests.
-
Benchmarking your entire system takes just a minute or two, and you can then compare your scores on Novabench to thousands of other similar systems.
-
You can also see further details about what each test measures if you click the GPU Score section (you’ll see it go green as you hover over it, then click it).
For gaming or overclocking, you may want to use a more advanced GPU benchmark tool like Unigine. It’s known for testing your Mac’s GPU under the most intense conditions, and it offers both extreme and custom presets that easily let you put your Mac’s graphics card through its paces.
Unigine’s GPU test renders interactive game scenes at the quality and resolution you set, helping you determine how well your GPU and the cooling system hold up under highly stressful conditions.
How to test RAM performance on a Mac
You can easily check your Mac’s RAM performance with the Activity Monitor app, which you can open via Launchpad. Faster RAM (random access memory) can mean better performance, especially when it comes to games and frame rates. If your RAM pressure is high, you may need to upgrade your RAM.
Here’s how to perform a Macintosh memory test:
-
Open Activity Monitor.
-
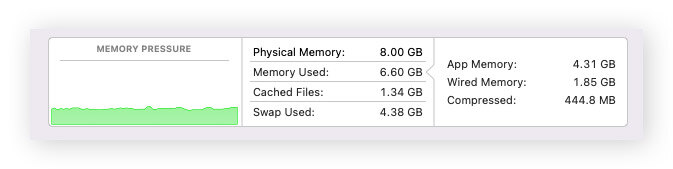
Click Memory to see the active processes and how much memory is being used.
 Activity Monitor displaying RAM usage data for active processes.
The Memory Pressure graph at the bottom of the screen will tell you whether or not your Mac is using memory efficiently.
-
Green memory pressure: Your Mac is using RAM efficiently.
-
Yellow memory pressure: Your Mac might eventually need more RAM.
-
Red memory pressure: Your Mac needs more RAM.
According to Apple’s Activity Monitor support page, free or unused memory doesn’t automatically mean your computer performance will improve. Instead, memory pressure is measured by examining the amount of free memory available, the swap rate, and the amount of wired and file-cached memory to determine if your Mac is using RAM efficiently.
Mac memory testing isn't always straightforward, because your operating system uses RAM to function all the time. But using your Activity Monitor (as shown above) will show you how much free RAM you have available and whether your Mac is using all of its RAM efficiently.
Why do you need to test your Mac’s performance?
Testing your Mac’s performance can provide key insights into identifying the root cause of performance issues. Running the Apple Diagnostics tests on your Mac and third-party benchmarking tools are useful to see if your Mac is performing as it should or if you need to address a problem.
While uninstalling Mac apps or clearing out Other storage are typical solutions to speed up your Mac, decreased performance may also signal hardware failure. Is the hard drive failing? Is your Mac overheating and causing damage? Do you need to add more RAM or check your storage? Or do you just need to give it a thorough cleanup?
What are performance benchmarks?
Performance benchmarks are standards based on how computers with similar specifications handle certain tasks. To determine if your Mac performance is underperforming, Mac benchmark testing compares your Mac’s performance to that of similar computers. If similar computers perform better, it may mean there’s a problem with your Mac.
Tools that benchmark Macs help you test the performance of your Mac’s hardware, including the CPU, disk speed, GPU, and RAM. By measuring the performance of your Mac against similar machines, you can gain a clearer picture of any weak points in your system.
What is stress testing?
Stress testing is a form of intense testing for software or hardware to see if its performance is stable. Computer stress tests don't mimic real-world usage but instead put a system or component under maximum and sustained pressure or stress to see how performance holds up.
The idea behind a Mac stress test is that if your machine can handle being pushed to its breaking point, it should be able to take ordinary or intense usage without breaking a sweat. Before overclocking your CPU, for example, you should always perform a stress test.
Maintain your Mac's performance with Avast Cleanup
Under heavy use, different active processes on your Mac can compete with one another for your computer’s resources. That can affect performance and slow you down. Apple Diagnostics and third-party tools are great for making sure your Mac’s performing as it should. Once you know why your Mac isn’t performing at its best, you’ll have a better idea of how to fix it.
In many cases, cleaning your Mac and ridding it of clutter is one of the best ways to keep it at peak performance. Avast Cleanup for Mac scans your device to clear out junk, clean up your browser, and so much more. Schedule automatic maintenance with Avast Cleanup and maintain strong Mac performance without breaking a sweat.
More Performance Articles

How to Get Your Mouse Cursor Back: 11 Tried and Tested Methods
How to Split Screens on Your PC or Laptop (Windows 10 & 11)

Your Phone Is Not Registered On a Network: What It Means and How to Fix It

Why Won't My iPhone Turn On? 6 Easy Fixes to Try

Why Your iPhone Gets So Hot and How to Fix It

Why Is My Ping So High and How to Reduce It

Why Your Keyboard Isn’t Working and How to Fix It in 6 Easy Steps

How to Right-Click on Mac With or Without a Mouse

How to Test for Packet Loss and Check Your Internet Quality

How to Fix Common Printer Problems

Why Does My Phone Keep Restarting and How Can I Fix It?

How to Show Hidden Files on a Mac
Performance Tips
Performance
Elle Poole Sidell
24-01-2022