Pro tip: parental controls aren’t just for parents. Anyone who shares their Mac with someone else should consider setting up parental control features for added privacy protection. Or, those with limited self-control — referring to our Reddit, Twitter, or Facebook addicts — can self-block tempting websites, which can be particularly helpful for a work-only account.
How to set parental controls on Mac
Setting parental controls for Macs is easy and convenient. Start here with parental controls for your MacBook Pro, MacBook Air, or Mac desktop computer. Then, learn how to set parental controls on iPhone & iPad for the ultimate childproof digital life. (If you don’t have an iPhone, check out our guide to setting up parental controls on Android.)
Step 1: Click the Apple icon and go to System Preferences
In the top-left corner of your Mac screen, you'll find the iconic Apple symbol. Click it and choose System Preferences.
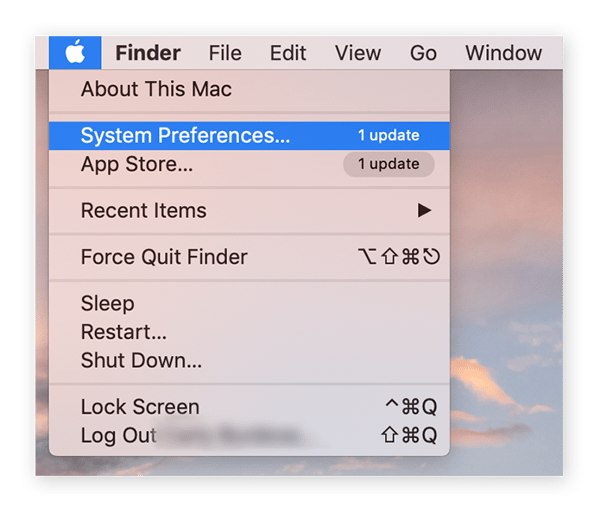
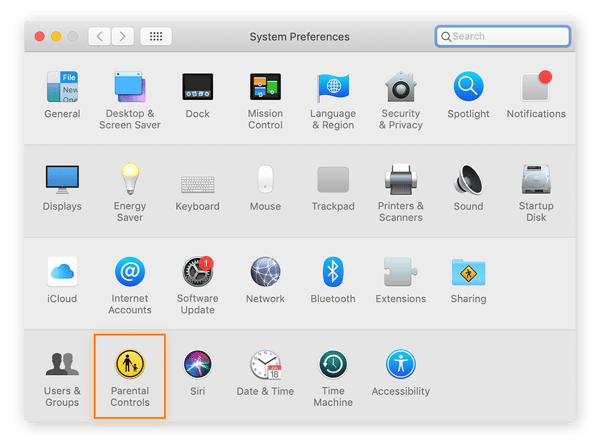
Step 2: Click the Parental Controls icon
On the System Preferences window, click the yellow and black Parental Controls icon in the bottom row to continue setting up Parental Controls.
Step 3: Select the account to modify
If you don’t have a secondary user account, skip down below to our section on how to set up a child account.
If you already have a second or third user account and want to learn how to modify or enable parental controls on that account, continue with these steps.
Click the lock symbol in the lower-left corner.
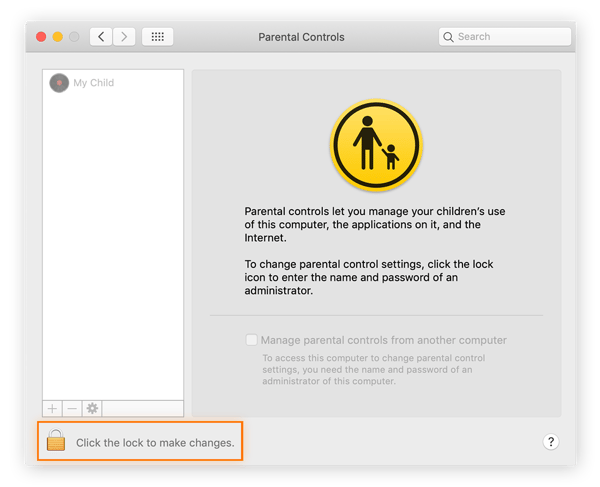
You’ll be prompted to enter your password. After doing so, select the account you want to modify with parental settings from the left-hand panel.
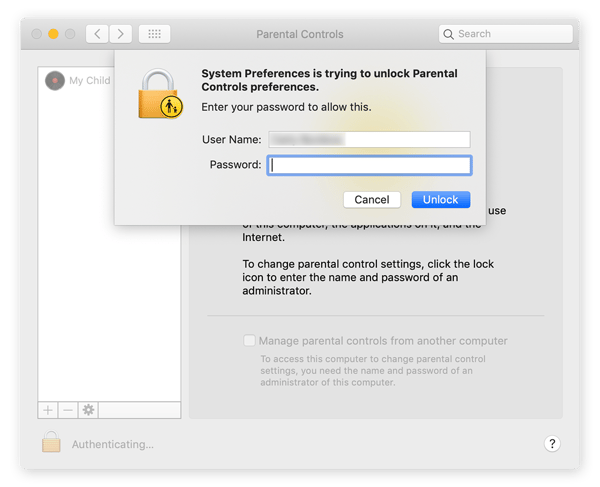
In the screenshot above, you’ll see an additional user account called My Child. Note that if you’ve already created multiple user accounts, you’ll see all of them displayed here. Select the user account you want to modify.
Step 4: Set Parental Controls
Now it's time to specify the parental controls on your Mac. You can set restrictions for six different categories: Apps, Web, Stores, Time, Privacy, and Other.
Go through each of these tabs and select the Mac parental controls that best fit the needs of you and your family. You’ll find specific guidance for all these settings below.

Take your parental controls a step further by grading yourself on this comprehensive checklist for privacy-savvy parents.
How to set up a child account
If you have only a single administrator account on your Mac, you’ll be prompted to create a new user account when you click the Parental Controls icon in System Preferences. The new account you create will be subject to your parental controls settings.
You must have at least one administrator account on your Mac. Only select Convert this account to a parental controls account if you’ve already created a secondary account with admin privileges.
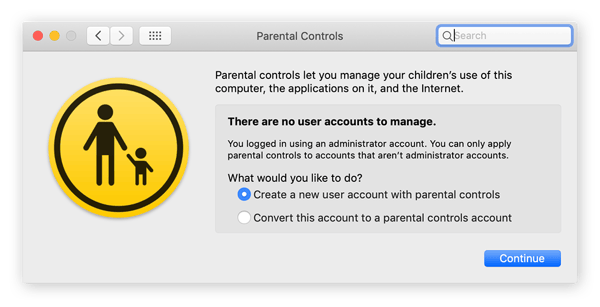
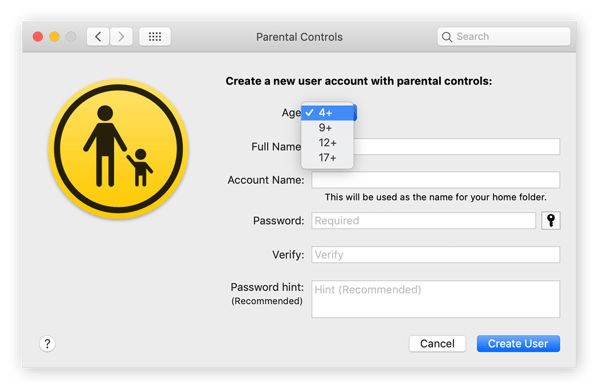
Otherwise, select Create a new user account with parental controls, click Continue, and enter your password when promoted. Then, name the new account, select an age category, and create a unique password for it.
How to set parental controls on iPhone and iPad
Parental controls are built into other Apple products as well. Learning how to set parental controls on iPhone and iPad is critical, as children are getting their first smartphones and tablets earlier than ever.
Four out of 10 British kids have their own tablet by the age of six, and 53% of American kids have their own smartphone by the time they turn 11.
Digital boundaries, website safety, and online monitoring are important parts of parenting in the 21st century — especially as children spend more and more time with their screens.
And as your kids’ screen time increases, it’s critical to make sure the websites they visit are safe and free from malware and other online threats. An all-encompassing cybersecurity app like Avast One will make sure that wherever your kids go online, their data and device stay protected.
What kind of parental controls are available on Mac?
There are tons of ways to childproof your Mac. Parental control features on Mac include limiting access to certain apps, setting usage caps for screen time, and even deactivating Siri.
You might not think removing printer access is important until your child (accidentally?) prints 50 full-color images of their favorite action hero.
To make the most of MacBook parental controls, you should scale everything back, and then add in features on a need-to-have basis.
Before you hand over your desktop or laptop to your child, check out this essential guide to Mac security to ensure you understand the risks digital threats can bring.
How to block access to apps on Mac
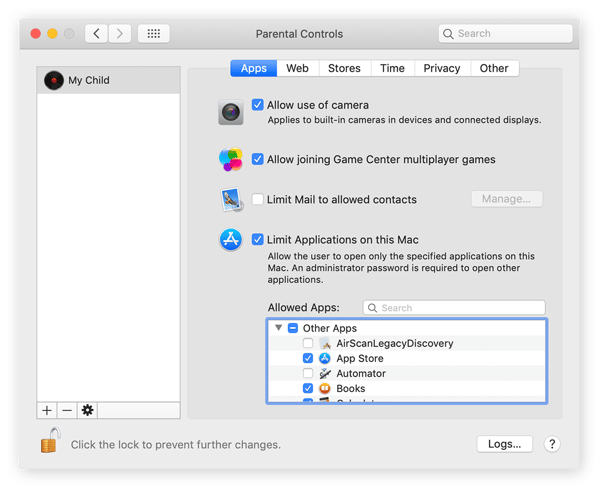
The Apps tab is your main dashboard for setting app access permissions on your Mac. Here, you can choose exactly which apps your child can and cannot access. From Zoom to Skype and Photo Booth to FaceTime, this is the parental command center.
Tick the box labeled Limit Applications on this Mac. Under the Allowed Apps section, click the dropdown arrow for Other Apps. All the apps available on your device are shown here. By ticking the corresponding box, you can grant and remove access to Photos, the App Store, Chrome, or any other application installed on your Mac.
How to block websites on Mac
To block websites on a Mac, navigate to the Web tab in the Parental Controls panel and choose the specific websites you want to restrict. This function applies only to Safari, macOS's built-in browser. To block websites on other browsers like Chrome or Edge, you’ll need to download specific add-ons or extensions for those browsers.
Here’s how to set up Safari parental controls on Mac:
-
Open Parental Controls, open System Preferences, and select Parental Controls.
-
Click the Web tab. Select Web from the top navigation panel in the Parental Controls panel.
-
Select Try to limit access to adult websites. This will make the "customize tab" option clickable.
-
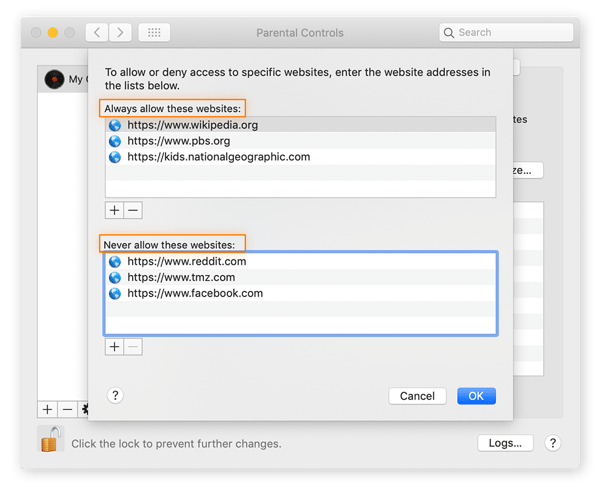
Click Customize. You’ll see two sections, one for websites that can always be accessed, and another for websites that should always be blocked.
-
Click the + or – symbols to add or remove websites. Copy and paste the URLs of the websites you want to allow or block.
Remember, even Macs can get viruses. So another great reason to set up Mac parental controls is to help keep digital novices on pre-approved websites only, reducing their risk of straying to malicious websites that can infect devices with malware.
How to control access to the iTunes Store on Mac
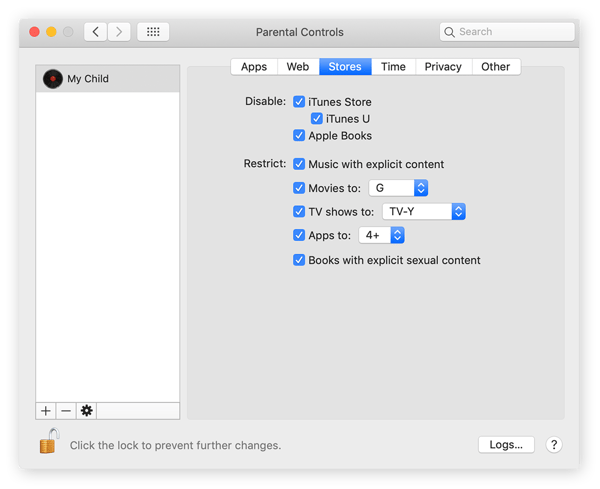
The Stores tab allows parents to control access to the iTunes Store and Apple Books. If children are granted access, you can still set limitations on the type of content they can find. You can set your preferred movie rating (G to NC-17) and block music and books with explicit content.
How to monitor and limit your child's screen time on Mac
When monitoring how your kids use their devices, don’t use creepy spyware that’s loaded with security risks. The built-in screen time settings within the MacBook and iMac Parental Controls panel make it super easy to monitor your kids online.
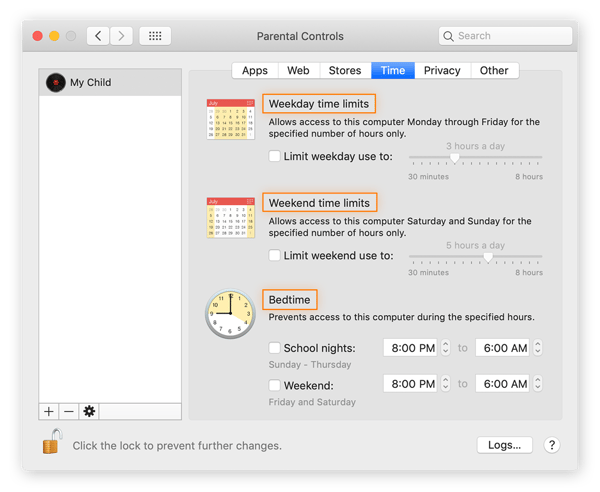
Have you decided how much screen time is too much for kids? Navigate to the Time tab in the Parental Controls menu and check your options for limiting screen time. You can set weekday time limits, weekend time limits, and establish special screen time rules around bedtime and school nights.
How to define privacy settings for data sharing on Mac
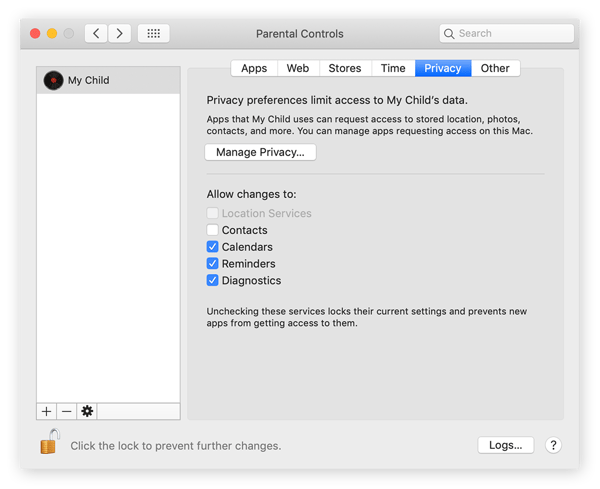
The Privacy tab is where you can protect your child's data by specifying the types of information that apps on your Mac can have access to.
Click the Manage Privacy button to get a list of the types of access an app might seek, along with the apps that can request this type of access. The data might include access to your location, photos, and contacts.
This level of access is often needed for the apps themselves to work properly — your Weather app needs your location data, and Zoom needs to use your microphone and camera.
A few more parental settings hacks for Mac
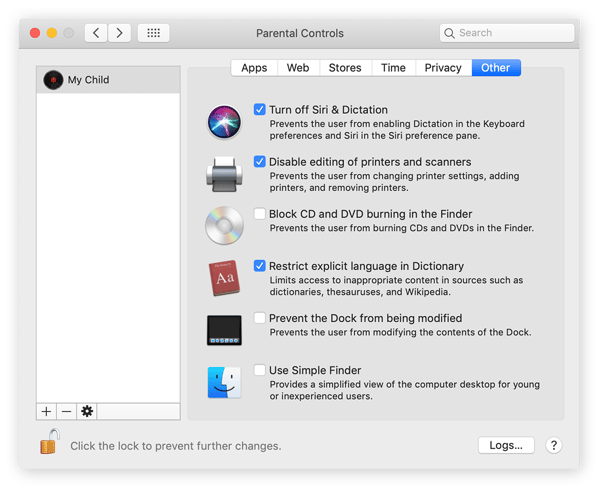
The remaining parental controls are under the Other tab. Here, you’ll find the controls you might expect, such as the ability to deactivate Siri, along with some next-level parenting hacks that’ll let your kids know who’s in charge.
How to turn off parental controls on Mac
You’ve turned them on, and now you're wondering how to get rid of parental controls on Mac? You can turn off Mac parental controls with just a few clicks. It's simple to set them up, and even easier to turn them off. To turn off parental controls on Mac, follow these steps:
-
Click the Apple icon and go to System Preferences.
-
Select Users & Groups.
-
Click the lock icon in the lower-left corner.
-
Type in your Admin password, then click Unlock.
-
From the left-hand column, choose which account to deactivate parental controls on.
-
Deselect the box Enable parental controls.
-
Click the lock in the lower-left corner to save and prevent further changes.
Keep your children safe online with Avast
Whatever category of caregiver you are, you'll be a qualified Mac parental controls pro after putting this guide into action. Setting up digital boundaries is a good step toward teaching digital literacy, protecting your young ones online, and feeling confident in handing over your precious computer.
The internet’s endless opportunity for digital exploration is a fantastic boon for developing your child’s curiosity and problem-solving skills. But with so much unsafe content out there, and so many risky websites, it’s important to equip your child’s device with strong cybersecurity.
Avast One is packed with a suite of security and privacy features to keep your children safe online. Stay protected from malicious activity, steer clear of dangerous sites, and keep your personal information safe with Avast.


