Why should I manage my Chrome extensions?
You should manage your Chrome extensions because unstable extensions can overwork your browser and cause your computer to slow down, malfunction, or overheat. Your computer has only so much space and speed to allocate. Extensions hog core computer resources and can present unwanted security risks if poorly coded.
But what are Google extensions exactly? Chrome extensions are browser addons that let you customize how your browser works, letting you block ads, correct grammar, and enjoy other handy features on Chrome. But the more extensions or plugins you have, the greater the drain on your computer’s memory. Too many Chrome extensions can unleash a torrent of Chrome notifications, weighing down even the fastest web browsers.
Faulty plugins can even cause your Chromebook or other device to crash. Since most extensions collect user data, they can also compromise your browser’s privacy capabilities. Some plugins may even mask malware, so be careful about what you install from third-party websites.
That’s why it’s important to manage your extensions in Chrome and remove Chrome extensions that are potential security risks or bog down your browser.
Here’s how to remove extensions from Chrome to get rid of any addons causing you trouble.
How to remove Chrome extensions
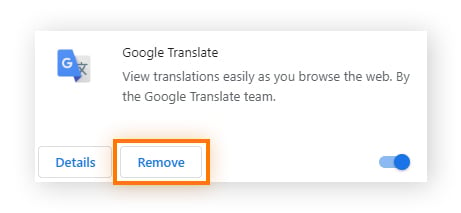
You can quickly remove extensions in Chrome by clicking the puzzle piece icon located in the top-right of the browser, selecting Remove next to the extension you want to remove, and then clicking Remove again in the confirmation window. This fast-track version of the extension manager is how to remove extensions from Google Chrome with fewer clicks.
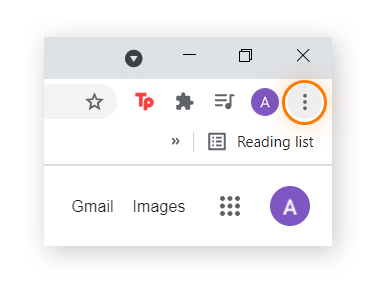
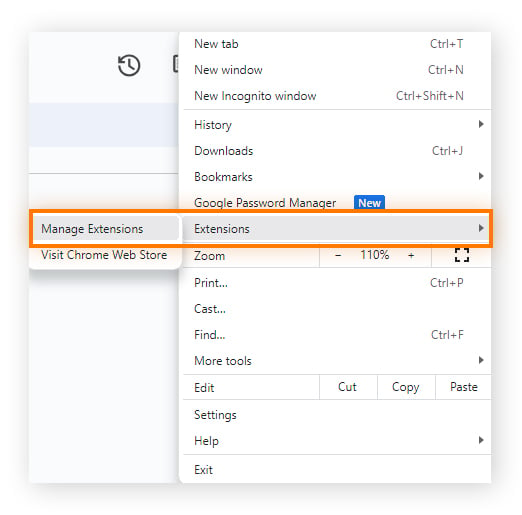
You can open the full extension manager in Chrome by clicking the three vertical dots located in the top-right of the browser, selecting Extensions, and then selecting Manage Extensions. From there, select Remove for any extension you don’t want, and then confirm by clicking Remove again in the confirmation window.
Even if you know how to remove Chrome extensions, many are sneaky and don’t want to be found. We’ll walk you through how to remove extensions from Chrome, step by step — including extensions that are hiding from you.
Here’s how to manage and disable Chrome extensions permanently, on both PC and Mac.
How to uninstall Chrome extensions that are visible
Wondering how to see what Chrome extensions you have, view their details, change their settings, and remove them? The best way to see and remove extensions in Chrome is with the full extension manager:
-
Open Chrome and click the three-dot icon in the right corner.
-
Select Extensions, then click Manage Extensions.
-
Click Remove to remove Chrome extensions or Chrome apps you don’t want, then click Remove again to confirm the removal.
You can also access the extension manager by typing chrome://extensions into your search bar.
Figuring out how to remove Chrome extensions is simple enough once you open the extension manager. But how do you see your Chrome extensions if they don’t show up?
How to delete Chrome extensions that are hidden
Before you can delete Chrome extensions, you have to locate them — but browser extensions aren’t always visible. Be wary of hidden browser extensions, because they can mask malicious programs designed to track your activity with techniques like browser fingerprinting. Some malicious extensions can spy on your online activity, even when you’re in Chrome’s Incognito mode.
Invisible browser extensions can appear as normal software to your system, making them particularly difficult to detect, even for ad blockers and the best antivirus software. We’ll help you find those Chrome extensions that you can’t even see.
Find and open your Default folder on PC
To find hidden Chrome extensions, you’ll need to close Chrome and then find your Default folder. This is where your computer keeps the actual code for the browser extensions you’ve installed — even the ones you didn’t know you had.
By deleting an extension’s root file from your PC’s Default folder, you can remove Google Chrome extensions without even opening Chrome.
Here’s how to locate and open your Default folder:
-
Go to your C drive. On Windows 10, you can access the C drive by searching for “This PC” in the Windows Search bar. You can also press Windows key + E to open the File Explorer, and then select This PC on the left-hand side.
-
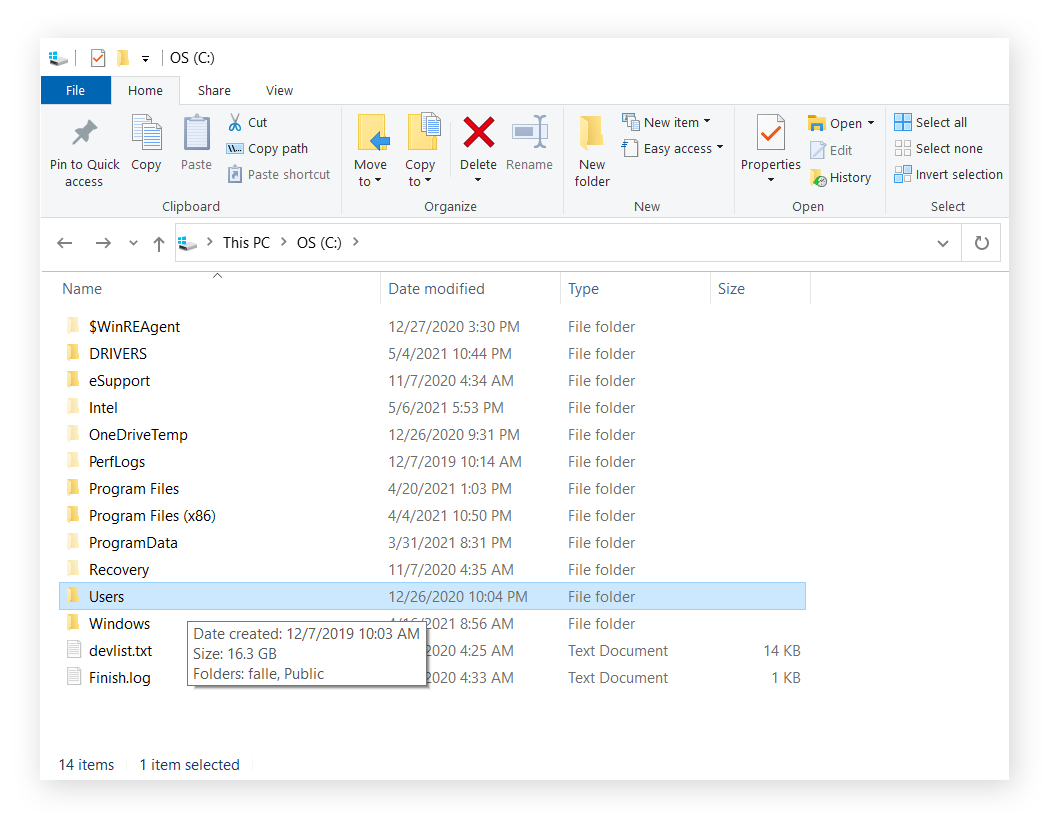
Open your C drive, click your Users folder, then select the username you use for your computer.
-
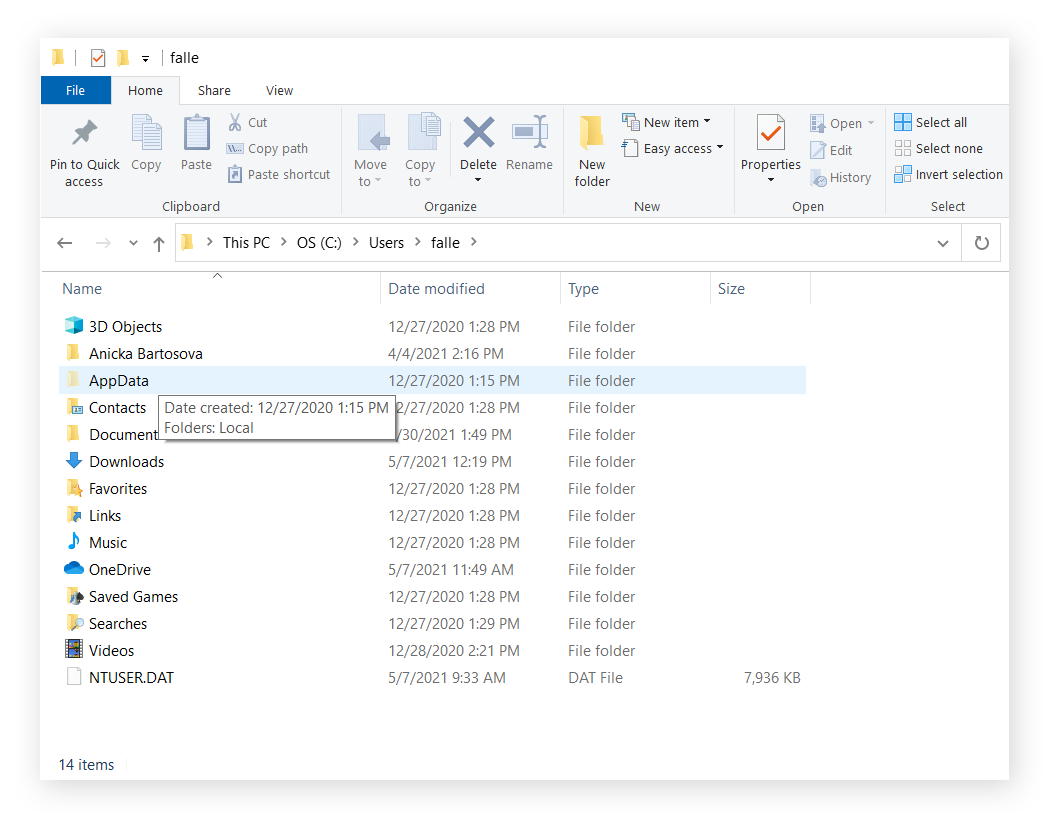
Find and open the AppData folder. If this folder isn’t immediately visible, open the View tab at the top of the window and select the box for Hidden items.
-
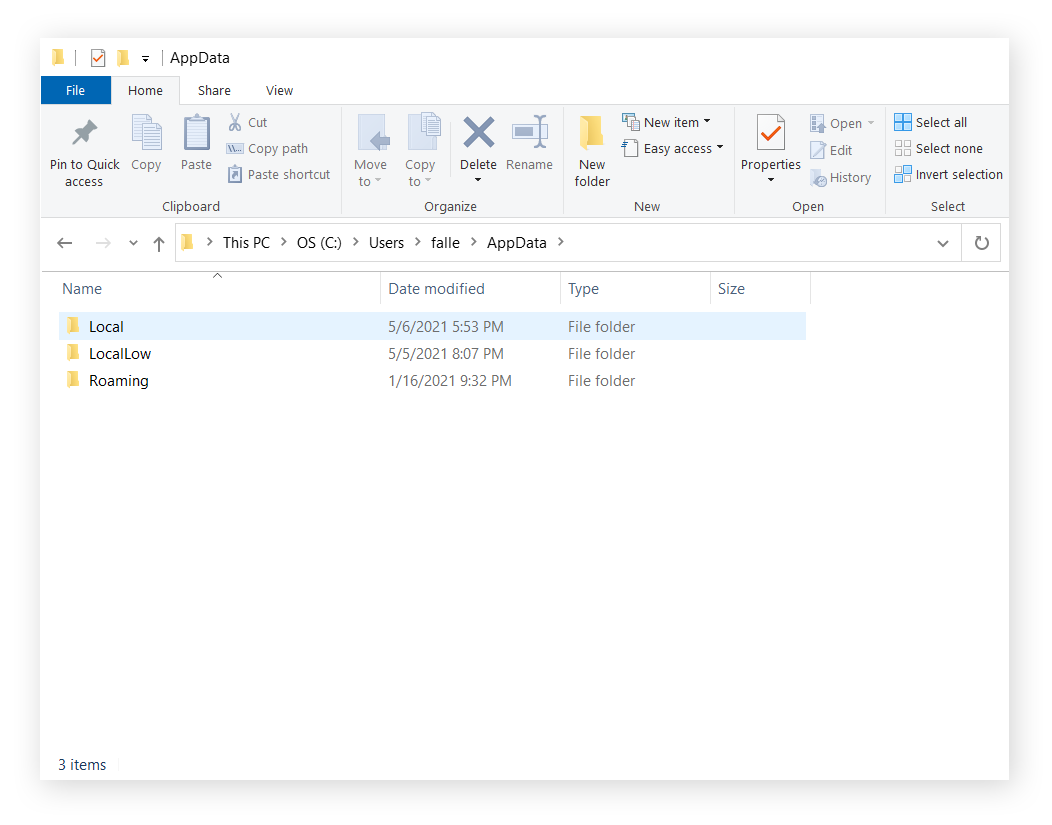
Now open your Local folder.
-
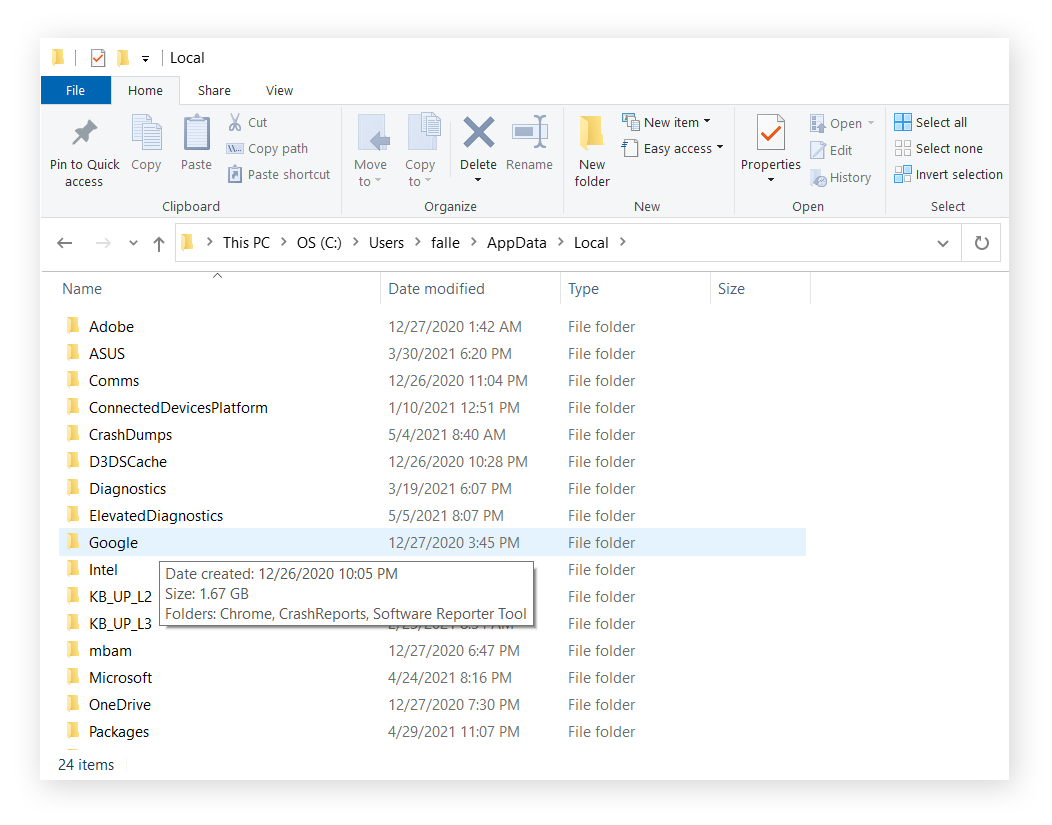
Then, click the Google folder.
-
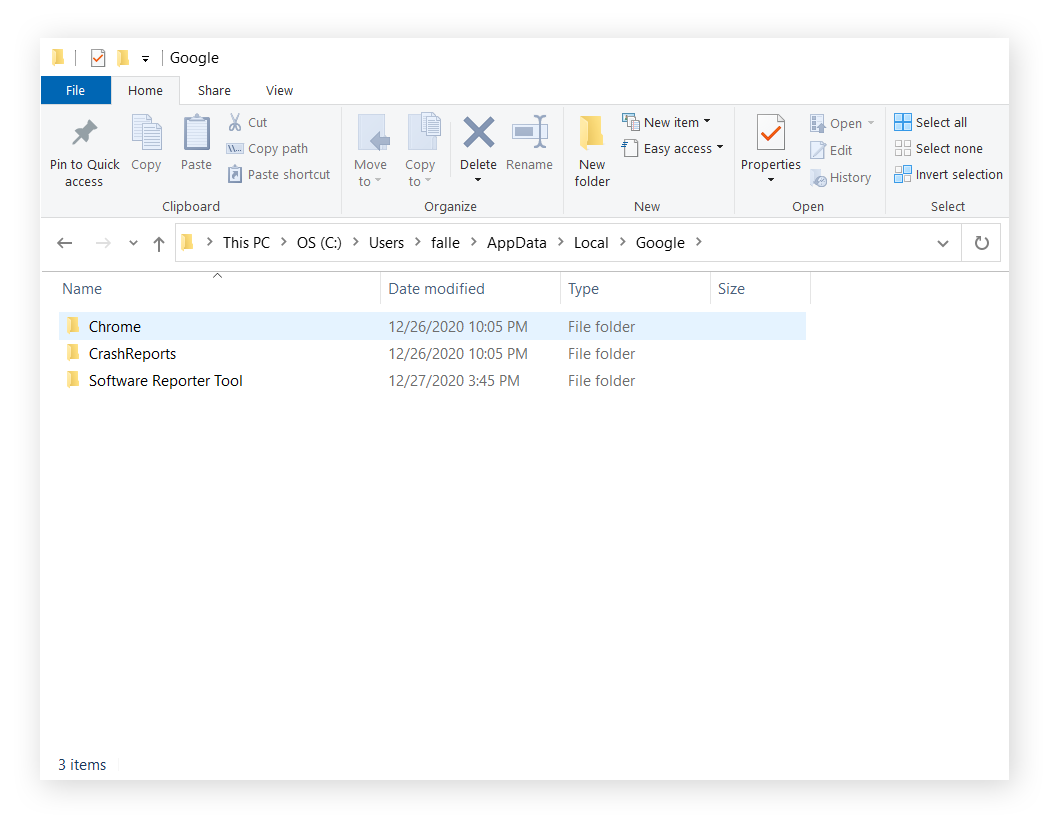
Now, click the Chrome folder.
-
Open the User Data folder.
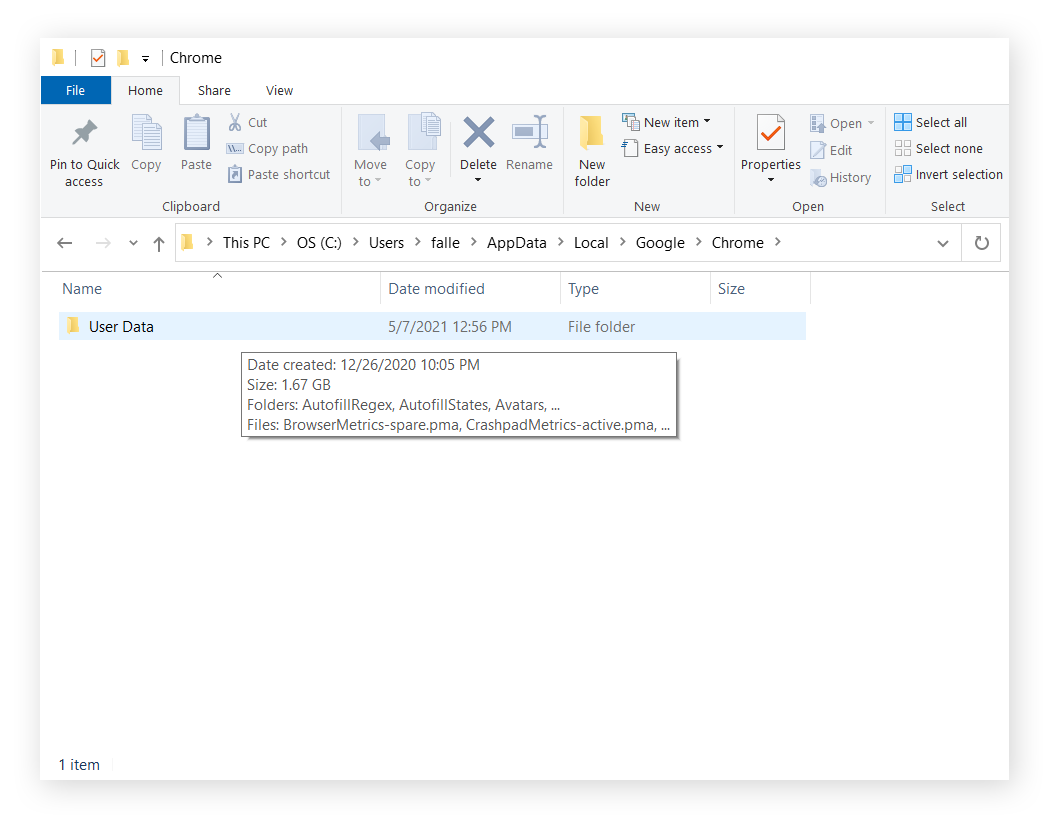
-
Now, open the Default folder.
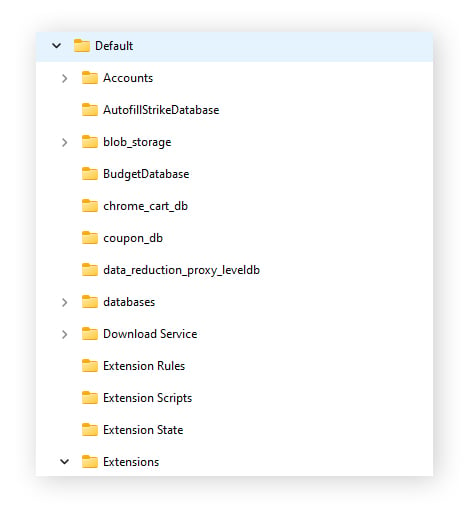
-
Then, open the folder named Extensions. In this folder, you can find all your Chrome extensions, even the hidden ones. Each extension is its own subfolder with a long string of letters.
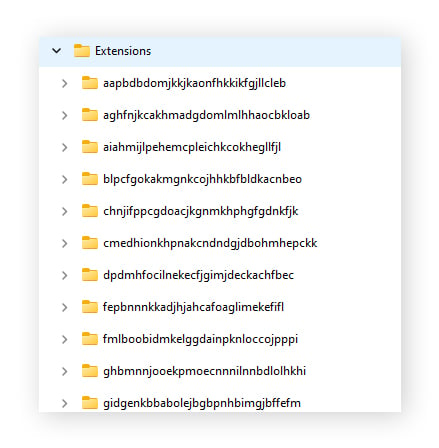
The strings of letters correspond to what Google uses for each extension’s URL — but it’s hard to tell which extensions belong to each folder. Since it’s an official Google ID, try simply Googling the string of letters of each file in the Extensions folder to identify the Chrome extension, and whether you want to remove it.
You can also toggle Developer mode on in the Extension manager to make each extension’s Google ID appear. You can then cross-reference the IDs in the Extension manager with the IDs in the Extensions folder.
To toggle Developer mode on in Extension manager, enter chrome://extensions into the address bar to open the Extension manager and toggle on Developer mode.
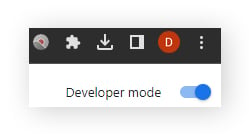
Then locate the extension, which will now have the extension's full ID.
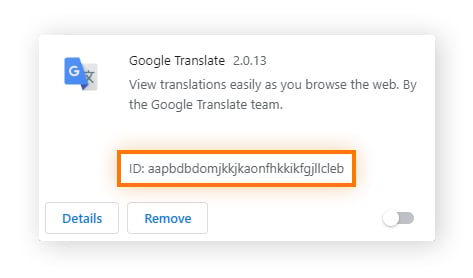
You can then check the Default > Extensions folder to see which extension belongs to which file. You can see that the ID for Google Translate above corresponds to the first file in the screenshot in Step 9.
Googling doesn’t always identify the extension clearly, however, and not all extensions show up in the Extension manager. So you might have to dive further into the extension’s file to identify the extension and then manually delete the hidden Chrome extensions on PC.
Manually delete hidden Chrome extensions on PC
After opening the Extensions folder in your PC’s Default folder, you’ll have to manually delete the Chrome extensions you want to remove. See the steps above to find your Default folder on PC, if you haven’t yet.
Now that you’ve opened your Default folder, follow along for how to remove Chrome extensions that are otherwise invisible:
-
In Extensions, each extension will correspond to a folder with a string of letters. Inside each extension’s folder, you’ll see a subfolder containing the extension’s version number.
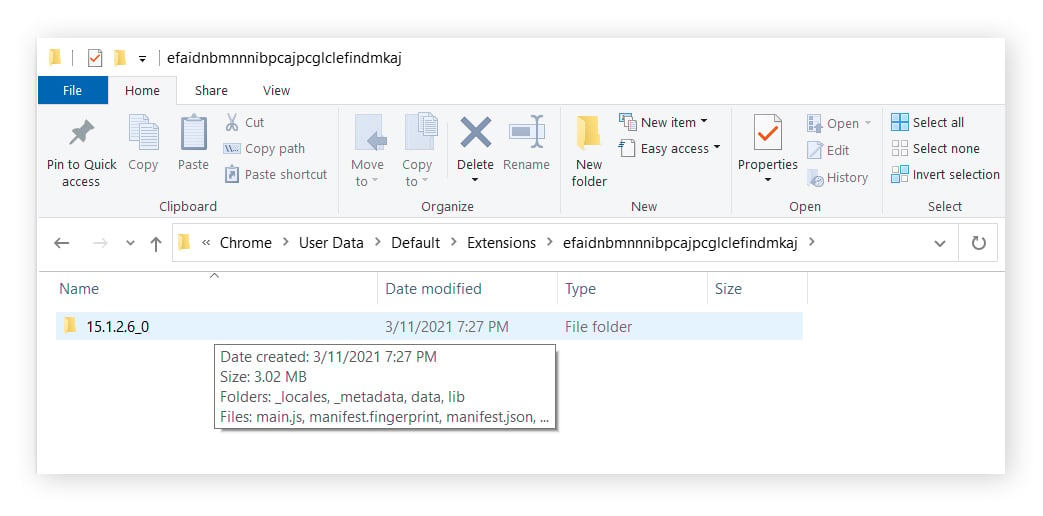
-
If you open the subfolder with the version number, there are files to identify which extension the file belongs to.
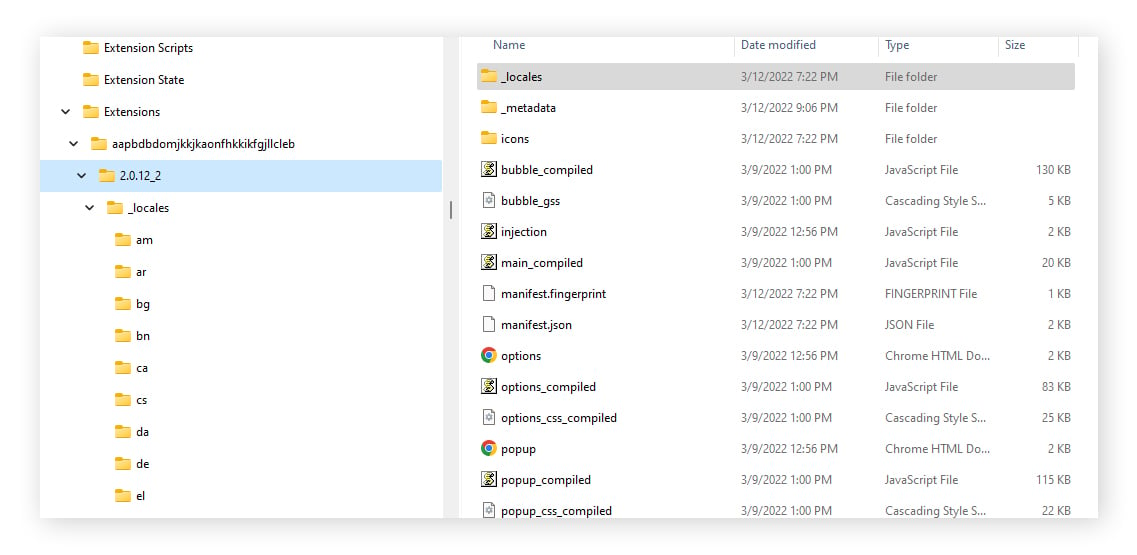
-
Right-click the JSON file (the file with .json at the end), and open it with a text editor such as Notepad.
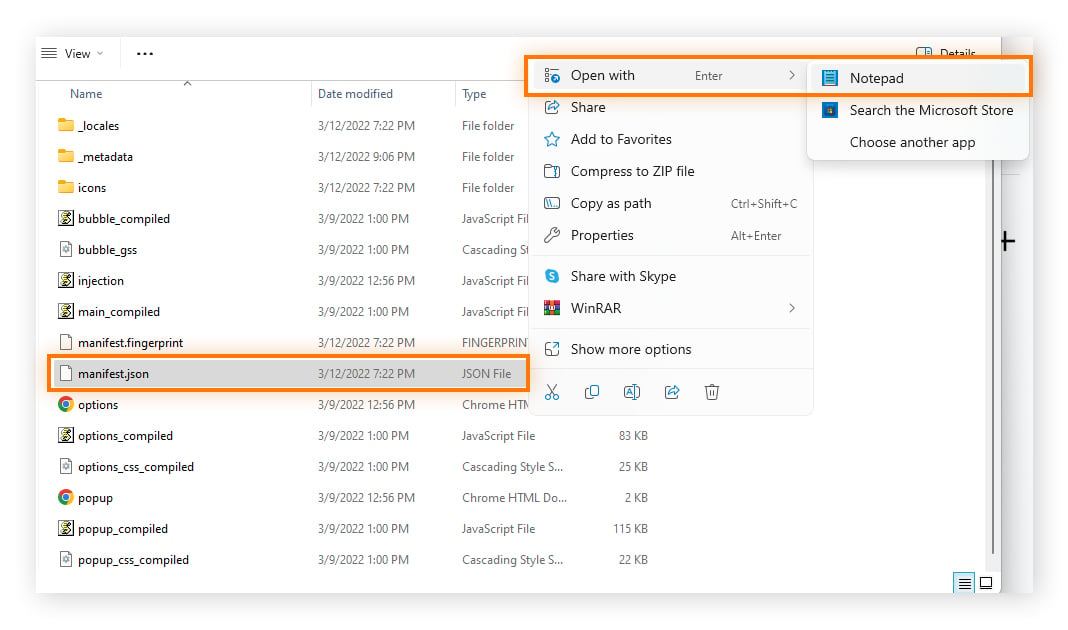
-
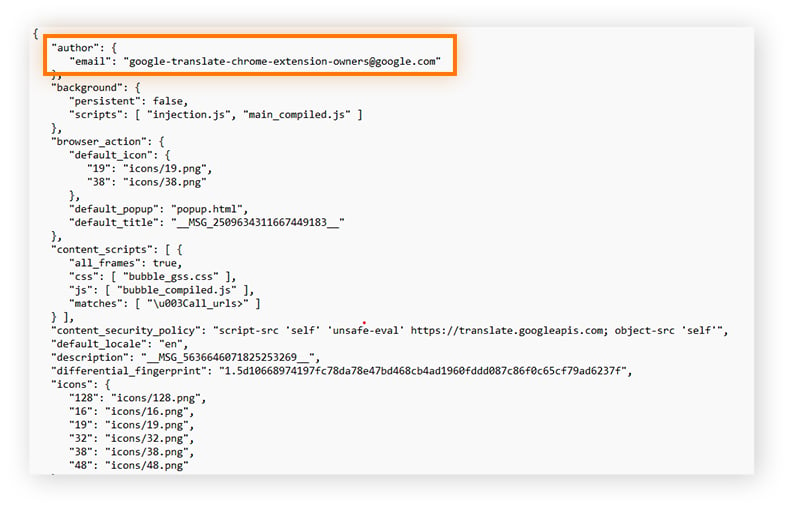
Look for the title of an extension you recognize or anything else that identifies it. In this example, you can see the text next to “email” identifies the extension as Google Translate.
-
If you’ve found a problem file — an extension you didn’t allow, or an addon with a cryptic name, for example — delete the folder.
-
Finally, restart Google Chrome to ensure that unwanted programs have been completely removed.
Find and open the Chrome extensions folder on Mac
Mac keeps the Default folder with Chrome extensions in its Library. The Library holds important system files that Apple wants hidden by default, so you have to know how to unhide the Library to remove Chrome extensions from Mac manually.
Here’s how to open your Mac’s Library to remove Chrome extensions:
-
Open Finder from your Mac dock, click Go on the Finder toolbar, and select Go to Folder from the menu.
-
Copy and paste the following into the field that appears: ~/Library/Application Support/Google/Chrome/Default/Extensions.
-
Then, press Enter to go directly to your Chrome extensions.
On macOS Monterey or newer operating systems, there is a Go to Folder interface, where you can simply type in “Extensions” to locate the Chrome extensions folder.
After locating the Extensions folder in Mac, it can take a bit of detective work to determine which Google extensions need deleting, since they are tagged with a 32-character ID provided by Google. Now let’s learn how to identify and remove the Chrome extensions you don’t want on your Mac.
Manually delete hidden Chrome extensions on Mac
Mac separates the Extensions folder into different Chrome user accounts. In each Chrome user account folder, the extensions for that account are listed as their Google ID: a string of letters 32 characters long. To determine which are hidden extensions, you have to see which extensions show up in Chrome.
Here’s how to see which Chrome extensions are hidden in Mac:
-
Go to the Extension manager by entering chrome://extensions/ in the address bar.
-
Turn on Developer mode in the Extension manager by clicking the blue toggle. Each extension's ID will now appear beneath it.
-
Navigate to ~/Library/Application Support/Google/Chrome/Default/Extensions via your Mac’s Finder app to cross-reference IDs as they appear in the Extension manager with the IDs as they appear in the Extensions folder.
-
Any ID in the Extensions folder that does not appear in the Extension manager is a hidden extension, and you may want to delete it. Remove it by deleting the file in the Extensions folder.
How to delete all Chrome extensions
Having trouble with extensions that don’t show up in the extension manager, or malicious extensions that just won’t delete? Extensions that won’t let you delete them are often a type of PUP or browser hijacker.
But don’t worry, you can delete all Chrome extensions — including those that can’t be removed any other way — by resetting your Chrome settings to the original defaults.
Here’s how to reset your Chrome settings and delete all extensions on Google Chrome:
-
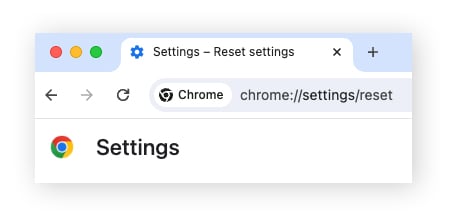
Type chrome://settings/reset into your browser address bar to navigate directly to the Reset settings screen.
-
Click Restore settings to their original defaults.

-
Click Reset settings to confirm your choice.
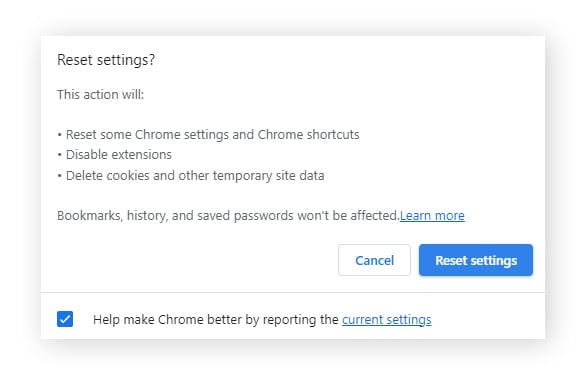
All your Chrome extensions will now be deleted, and Chrome will be extension-free.
How to temporarily disable Chrome extensions
Chrome doesn’t allow you to disable all extensions at once, but some Chrome extensions let you do so, such as Disable Extensions and Apps. After installing Disable Extensions and Apps, you can press Ctrl + Shift + E to disable all Chrome extensions simultaneously (except for Disable Extensions and Apps). Press Ctrl + Shift + E again to enable your Chrome extensions once more.
Temporarily disable individual Chrome extensions
You can disable specific Chrome extensions temporarily by accessing Chrome’s Extension manager. Each extension is listed in its own box, along with a slider that lets you temporarily disable that extension from running in the background, or from reading and changing site data.
Here’s how to disable extensions in Chrome temporarily:
-
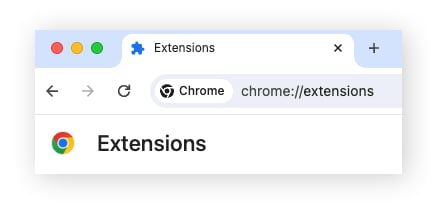
Type chrome://extensions/ into your address bar, and press Enter.
-
Locate the extension you want to temporarily disable and Click the blue toggle so it becomes gray.
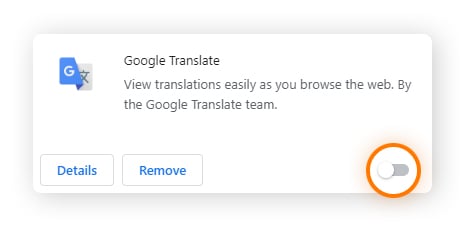
To re-enable Chrome extensions, simply toggle them back on again.
Temporarily disable all Chrome extensions
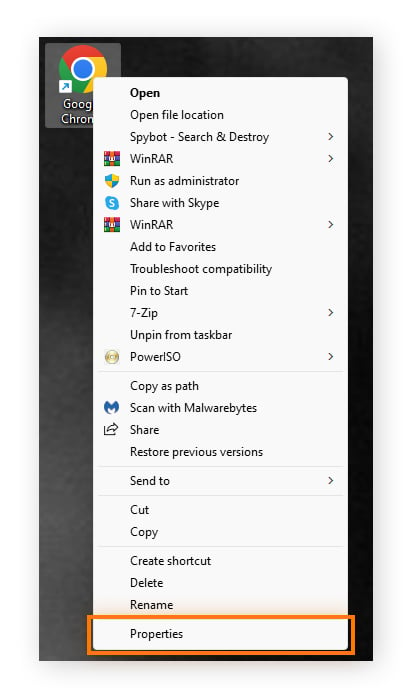
You can also disable all Chrome extensions temporarily by changing Chrome’s properties. To block Chrome extensions on Windows completely, you have to open Chrome’s properties by right-clicking it, navigating to Chrome properties, and then typing –disable-extensions at the end of Chrome’s target path.
Here is how to disable all Chrome extensions temporarily:
-
Right-click the Chrome icon and click Properties.
-
At the end of the field next to Target, after chrome.exe, press space and enter --disable-extensions (use two hyphens at the beginning). Then click Apply.
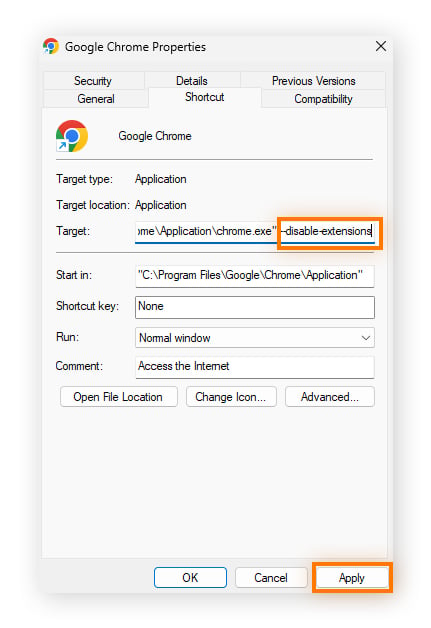
All Chrome extensions will now be disabled. The extensions will still show up in the Extension manager, and they’ll be toggled on, but they are still non-functional.
If you’re wondering how to re-enable extensions in Chrome, simply retrace these steps, but delete “--disable-extensions” and then click Apply again.
How do I know which Chrome extensions to delete?
Many Chrome extensions are convenient or fun. But these plugins can also collect user data and put your privacy at risk.
Not sure how to tell which extensions are safe? Here are typical signs that a browser extension shouldn’t be trusted:
-
If you didn’t give an extension permission or download it yourself. Browser extensions require your permission before they can make changes to your computer. As such, any app that you don’t recognize or that changed settings you didn’t authorize should sound the alarm bells.
-
If you find an unexpected update. Popular web browsers like Google Chrome will automatically update extensions you’ve installed. But sometimes, clever hackers can push through a fake “update” as a vehicle to deliver malicious payloads.
-
If your browser starts behaving strangely. If you use extension apps, any unusual browser activity — an onslaught of advertisements, sudden lags, and the like — is a red flag that one of them could be compromised.
Chrome extension best practices
Here are a few Chrome extension tips to keep in mind to help safeguard your privacy and security and keep your browser running smoothly:
-
Only install from legitimate sources. You should only use secure browser extensions that come from a reputable source. The Google Chrome Web Store and Avast’s Addons Store are two places to get trustworthy plugins. Be wary of other third-party sites offering addon downloads.
-
Research the developer. Go to the developer’s website to see if they have a track record of trustworthy apps, extensions, or other software. If the extension is a one-off, you can’t find any information about it, or the extension’s site looks unprofessional, proceed with caution.
-
Check reviews. Every extension in Google’s Chrome web store has a user rating from 1-5 and tells you how many users reviewed it. At a glance, a high rating with a lot of reviewers is a great sign. You can also read written reviews to see what people generally like or dislike about the extension, and if it’s for you.
-
Apply updates regularly. Extensions need updates to patch security holes, add features, iron out bugs, and fix compatibility issues. Google updates extensions automatically, but not immediately. Manually updating your plugins via the Extension manager can help you stay safe and fully up-to-date.
-
Only install extensions you need. The more extensions you install, the more you affect your system’s performance, and the more you open yourself up to an unsafe extension. Only install extensions that truly improve your browsing experience. And when it comes to browser safety, use the best security and privacy extensions for Google Chrome.
How to remove extensions from other browsers
Do you use other browsers along with Google Chrome? We can also show you how to get rid of annoying or troublesome addons in Safari, Firefox, and Microsoft Edge.
Removing Safari extensions
To remove extensions from Safari:
-
Open Safari and click Safari on the top menu ribbon.
-
Click Settings and then select Extensions from the menu.
-
Select the extension you want to uninstall and click Uninstall.
Removing Edge extensions
To remove extensions from Edge:
-
Open Edge and click the Menu button (three horizontal dots).
-
Select Extensions and click Manage Extensions.
-
Under the extension you want to remove, click Remove and then Remove again to confirm.
Removing Firefox extensions
To remove or manage extensions in Firefox:
-
Open Firefox and click the Menu button (three horizontal dots).
-
Click Add-ons and themes followed by Extensions.
-
In a new tab titled Manage Your Extensions, your extensions will be listed.
-
Click the three horizontal dots next to the extension you want to delete, then click Remove.
Rather than digging around in hidden folders or managing extensions across multiple web browsers, get Avast Secure Browser, which can help block malicious extensions and ads automatically. You can also use Chrome extensions on Avast Secure Browser, or check out the Avast extension store for other options.
Built with your privacy and security in mind, Avast Secure Browser includes dozens of features to protect your private data. Plus, it automatically blocks malicious extensions and infected websites so you always browse more safely.
Use Avast Secure Browser for extensions that you really need
The best defense against browser extension issues is to start at the source. If you’ve never changed your default browser, it’s time to do it. Avast Secure Browser lets you enjoy the convenience of your favorite Chrome addons but with advanced online privacy protections.
Avast Secure Browser automatically blocks malicious extensions so you’ll never be tricked into downloading an infected plugin. And with features like automatic ad-blocking and website encryption, you’ll get increased security that won't slow you down. Download Avast Secure Browser to browse, shop, and bank in peace.