What are PC hardware specifications?
PC hardware specifications are a summary of a computer’s internal components, including its processor, memory (RAM), Windows version, and other system information. Examples of PC specs include hard drive capacity and processor speed. PC specs can show you how well your computer can perform certain processes.
A computer may run slowly — or even crash — if just one of the specs is too low for a particular application. Some video editing programs are incredibly resource-heavy, meaning they have to modify high-quality video files. The standard consumer-level PC will struggle to run these programs as intended.
A computer’s components not only need to handle what you throw at them, but they must be configured to take advantage of their strengths. Every component uses “drivers,” which tell the computer how to operate that component. Manufacturers are constantly optimizing drivers, and your computer will run better if you update your drivers regularly.
Thankfully, there are programs that will update all your drivers automatically, so you can spend more time working or playing, and less time setting up. And if you need to know how to check your PC specs because you’re looking to build a gaming PC, be sure to check out these tips on how to optimize Windows 10 for gaming.
How do I check my PC hardware specifications?
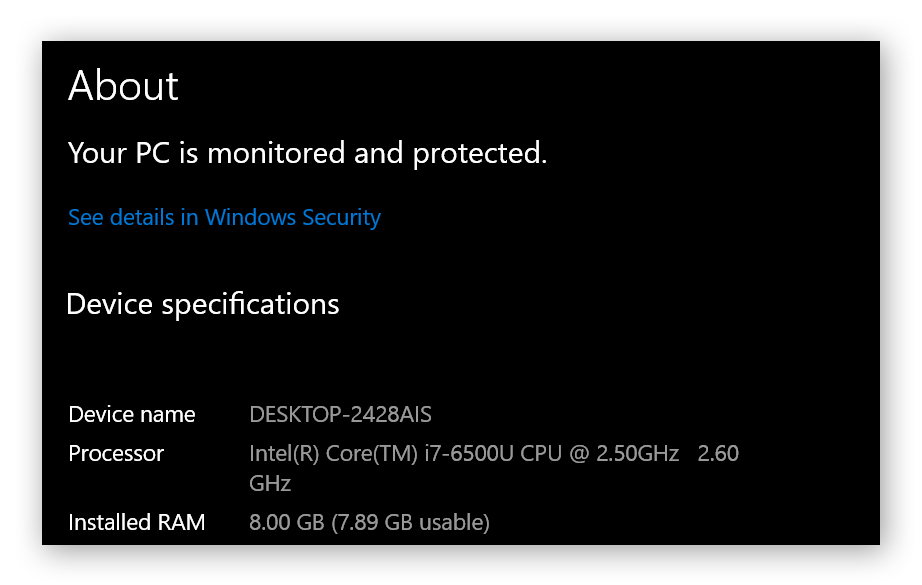
You can check your PC hardware specifications on the About page of the System section in Windows Settings. This screen will display a helpful summary of your hardware specs, such as processor type and memory (RAM), as well as your Device ID and information about your Windows installation.
Here’s how to find computer specs in Windows Settings:
-
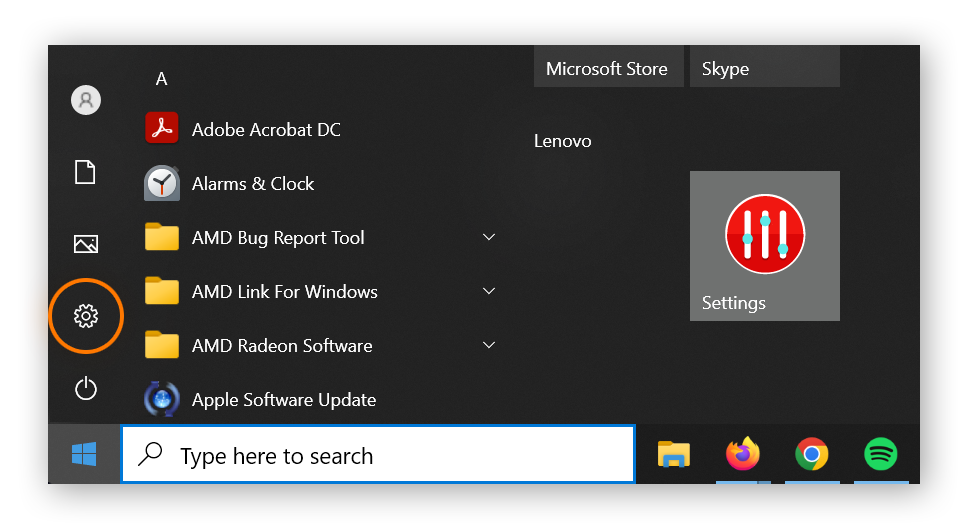
Click the Windows icon in the lower-left. Then, click Settings (the gear icon).
-
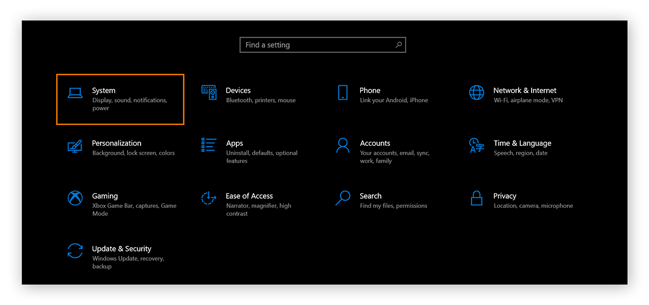
Click System.
-
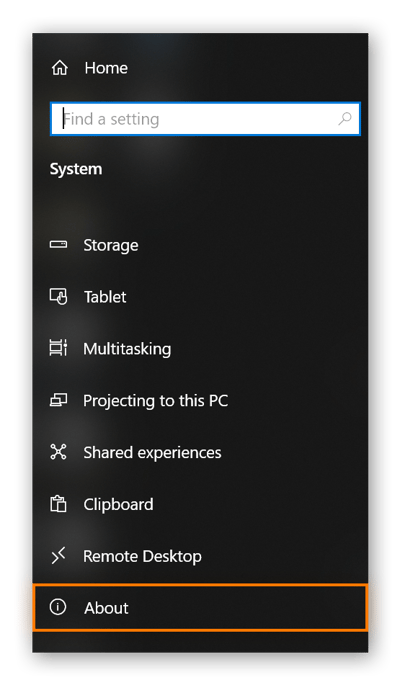
Now click About. It’s on the left-side navigation and you may have to scroll.
-
An information screen will display letting you review your computer specs.
If you’re an advanced techie and want to perform a more in-depth PC hardware check, click Device Manager from the list of navigation options on the right side of the screen, or launch it via the Windows taskbar. But don’t change anything in Device Manager unless you really know what you’re doing. Knowing how to check PC specs is an important first-step in diagnosing any issues you may be having while running certain programs or apps. If your specs match the requirements for a program like Photoshop, but it isn’t running well, try to speed up your PC or optimize your PC.
How to find PC specs using System Information
You can also find your PC specs by going to System Information and navigating to System Summary for an overview of your specs as well as the current version of Windows you’re running.
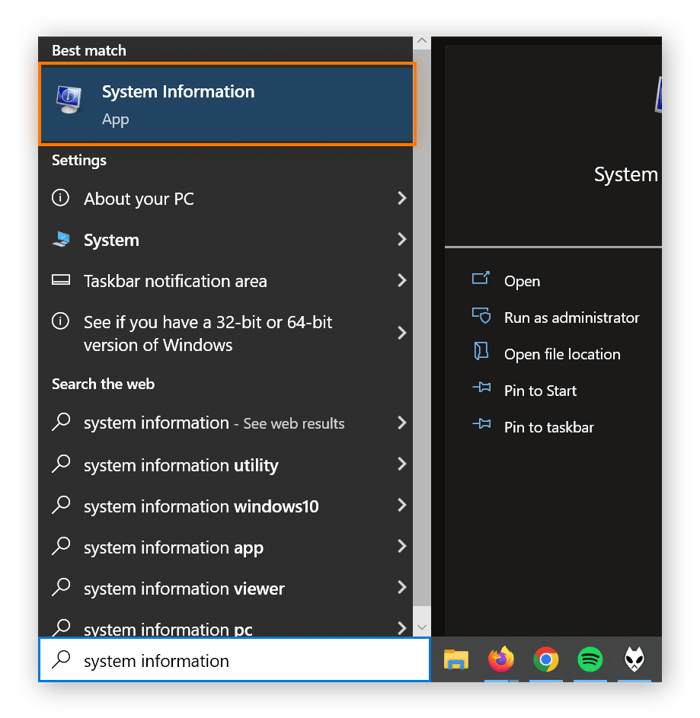
To find your PC specs using System Information, start typing “system information” into the taskbar search field and click on System Information. In the left navigation menu, click System Summary and an overview of your specs will display to the right, including what version of Windows you’re running.
Here’s how to see PC specs via System Information in Windows 10:
-
Type “system information” into the Windows taskbar search field and click System Information.
-
In the left navigation menu, click System Summary and then review the information displayed on the right-hand side.
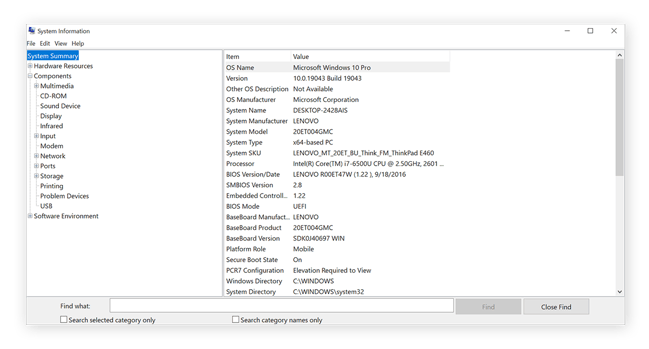
If you just want to know how to see what hardware your computer has, then System Summary provides a good overview of your computer specs — including the exact make and model of your machine, and the kind of processor and motherboard it’s packing.
How to find PC specs using PowerShell and Command Prompt
PowerShell and Command Prompt are advanced ways of navigating Windows computers. Command Prompt was the traditional method of navigating Windows before it gained the more user-friendly interface we’re now used to. PowerShell is a more advanced version that adds increased complexity and functionality.
Most Windows users don’t ever have to touch these apps, but here’s how to check specs through PowerShell and Command Prompt.
-
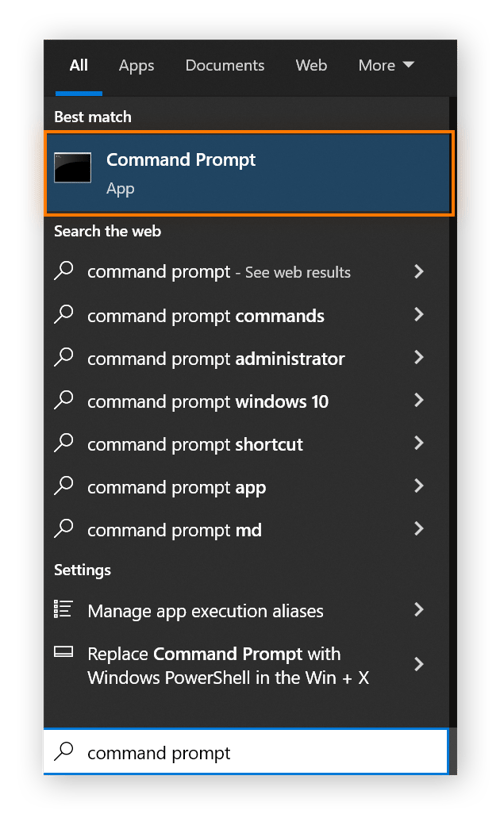
Type either “powershell” or “command prompt” into the Windows taskbar and click the corresponding icon.
-
Type “systeminfo,” and hit enter to run the script.
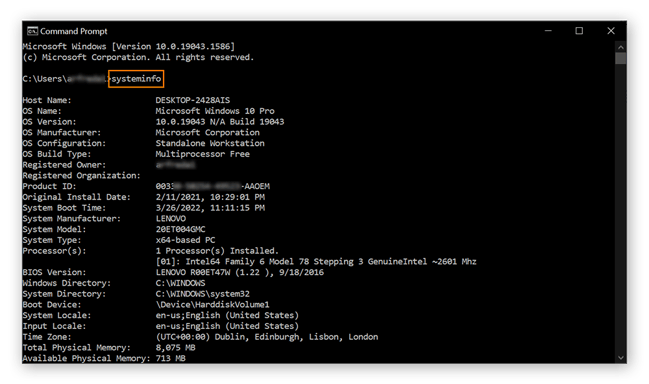
After a few seconds, your PC specs will appear. You can scroll through the results to see more information about your operating system, processor, and available memory.
How to find PC specs using DxDiag
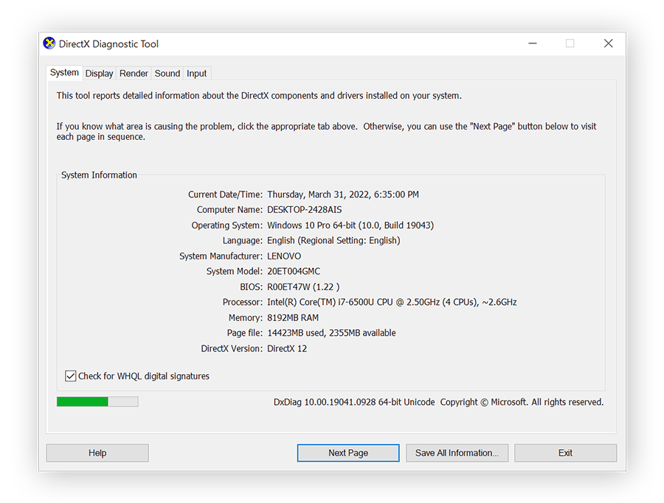
Dxdiag (or DirectX Diagnostic Tool) is a sound and video diagnostic tool that can help you find detailed info about your video and audio settings, and whether they’re compatible with a particular program you want to use. The tool won’t magically fix audio that isn’t working, but it can display information that an expert can use to troubleshoot problems.
All it takes to launch the tool is to type “dxdiag” in the taskbar and click dxdiag. The DirectX window contains different tabs at the top that you can navigate for various audio and video information.
If you’re having trouble with your PC’s sound, try updating your audio drivers to fix the problem.
Check your CPU
Central Processing Units (CPUs) are the PC’s nerve center, where the bulk of the computational processing is done. The model, type, speed, and performance of your CPU all have a major impact on your computer’s capabilities, and often determine whether you can run high-end professional software or play particular games.
To check your CPU, type “cpu” into the taskbar and click View processor info.
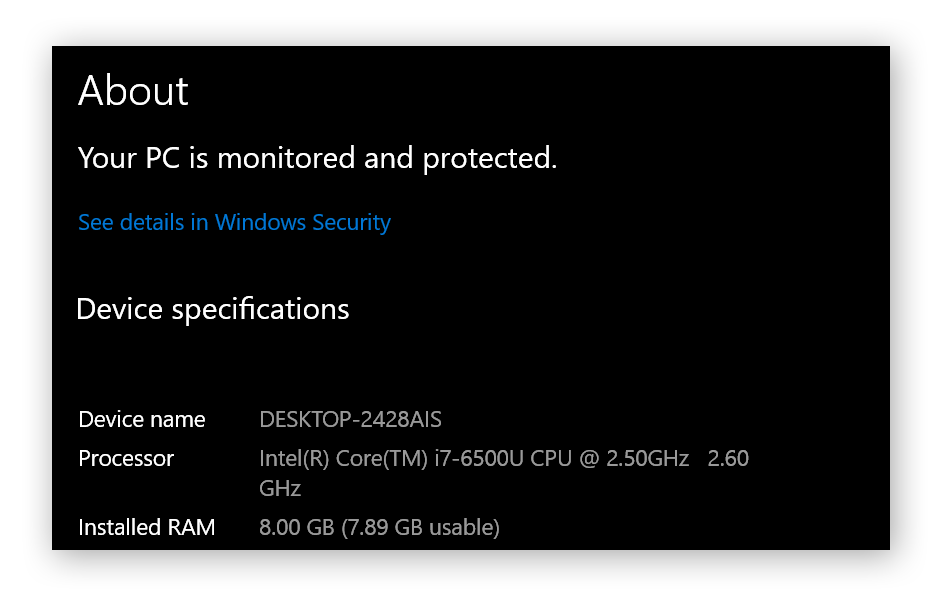
Let’s walk through an example of CPU specifications shown in the screenshot above:
-
Intel is one of the main processor manufacturers, known for producing the most efficient (but expensive) processors.
-
Core is a type of Intel processor aimed at everyday, mid-level needs.
-
Intel Core i7 has more processing power and multitasking capabilities than i3 or i5. This is a key spec to look for if you use video editing software, because i3 chips will feel noticeably slower.
-
6500U is a 6th-generation chip, and the three numbers after the “6” indicate performance rank. The higher the number, the better the performance.
-
U is a special designation for laptops, which must manage power efficiently to preserve battery life.
-
GHz (or gigahertz) represents the clock speed of a processor, which is essentially how many functions it can execute in a second. The first number is the estimated clock speed of the processor, while the second number shows the actual current speed.
Of course, these numbers assume you’re using the computer as intended. Overclocking your CPU can boost performance beyond official manufacturer specifications, but at a greater risk of system failure due to overheating.
If you overclock to try to get more performance than your specs might indicate, be sure to use a tool that monitors CPU temperature. And overclock only if you know what you’re doing — otherwise you risk breaking your machine.
Check your GPU
The Graphics Processing Unit (GPU) — also known as a graphics card or video card — handles everything related to graphics. The GPU is one of the most important components when it comes to PC specs, especially for graphic designers, gamers, or other users requiring high-powered visual rendering.
The easiest way to see what video card you have is to type “device manager” in the taskbar, and click Device Manager. Then click Display adapters to show the relevant information. Your video card is probably from one of the major GPU manufacturers: AMD or NVIDIA.
If neither of those brands are shown or you only see “Intel graphics,” you probably have integrated graphics (the most basic and low-end kind of graphics processing).
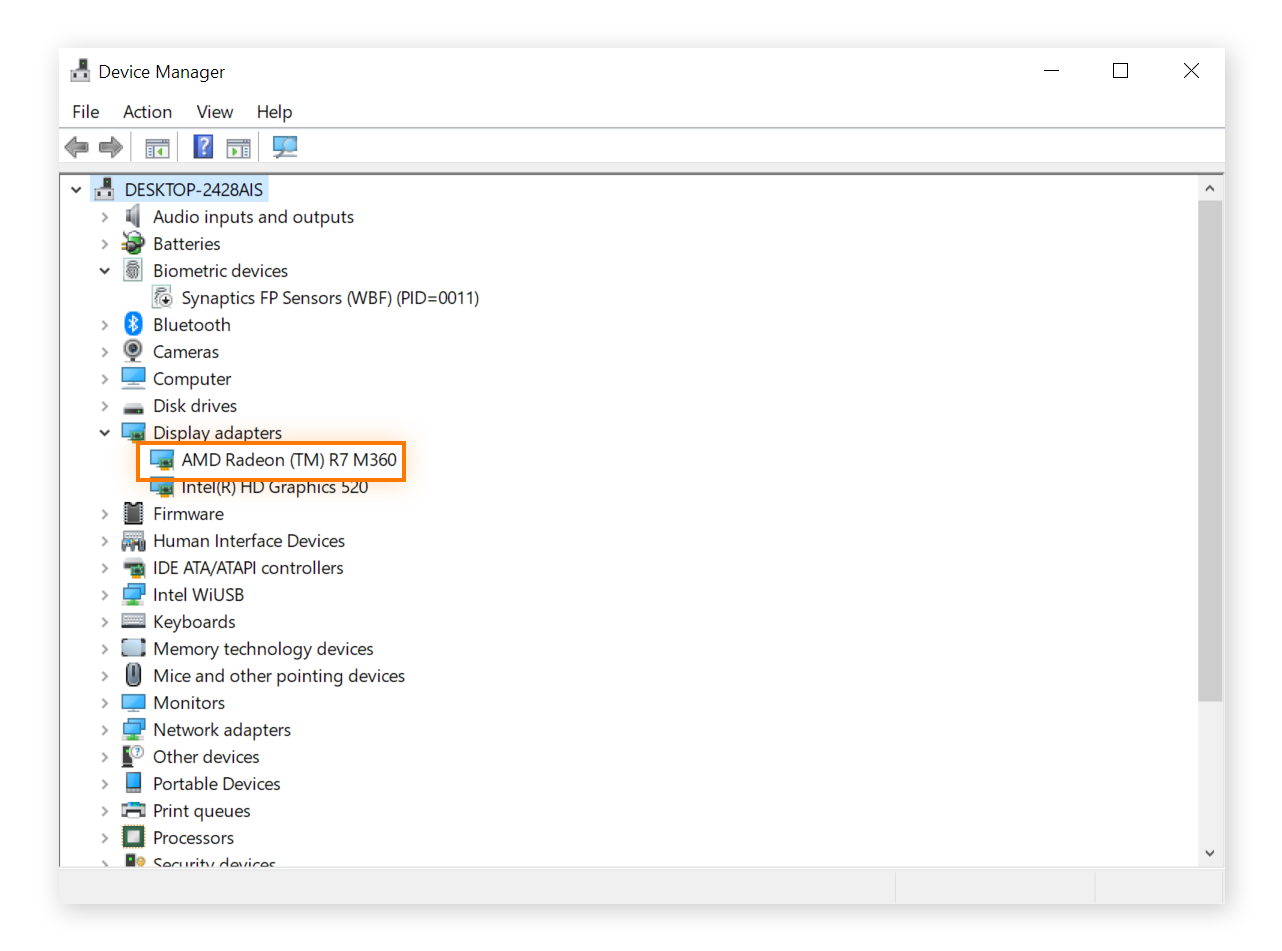
Each graphics card manufacturer uses different naming conventions, so it’s best to use one of the many online tools for comparing graphics cards. These comparison tools can also tell you how well your machine can run a certain game.
In Google, search “[full name of recommended video card] vs. [full name of your video card].” For instance, Grand Theft Auto V’s recommended video card is AMD HD 7870 2GB, so someone using the GPU shown in the screenshot above can google “AMD HD 7870 2GB vs. AMD Radeon (TM) R7 M360” to see how they stack up.
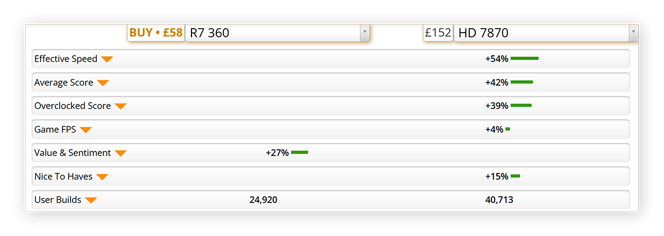
According to UserBenchmark, the HD7870 is clearly the higher performing graphics card.
But even the best graphics card is nothing without the right drivers. Before you attempt to run a game, or diagnose any problem, update your graphics drivers first. And make sure you know how to check and update GPUs in Windows.
You can always squeeze even more power by overclocking the GPU, but if your GPU is handling things smoothly at its intended performance level, then there’s really no need. And beware that pushing video cards past their design specs can shorten their lifespan dramatically.
Check your RAM
RAM (or random access memory) is another critical component for determining computer performance. In general, the more RAM, the better — although each gigabyte of RAM added yields increasingly diminishing returns to the point where anything above, say, 16GB of RAM will impact your wallet much more significantly than it will improve PC performance.
To check RAM memory, type “ram” in the taskbar and click View RAM info. The amount of RAM will be visible next to Installed RAM.
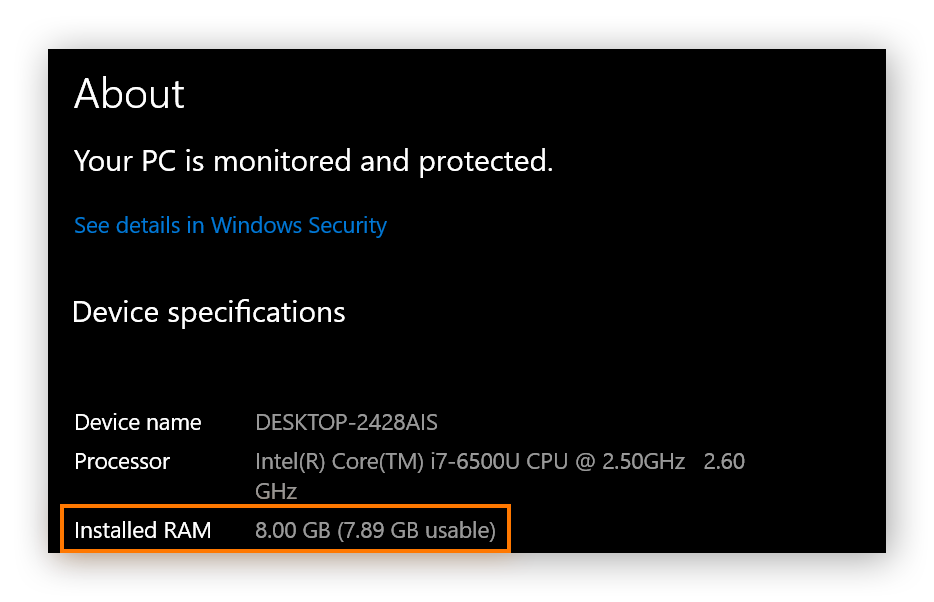
This computer has 8GB of RAM installed, which is a reasonable amount for most people — even relatively high-end gamers. 12 or 16GB of RAM is necessary only if you need to use several high-intensity, professional-grade programs at once.
If your device has 4GB of RAM or less, upgrading your RAM will help you get faster and smoother performance, and run more advanced applications. Unfortunately, some computers (especially laptops) do not have removable RAM cartridges, so be sure to check before you spend money on an upgrade.
Check your storage
Disk storage is another key spec to keep in mind. The kind of SSD or HDD you have affects the volume of data that can be stored on your computer and how fast those files can load and transfer data. SSDs are far ahead of hard drives in terms of speed (not so much in capacity), so you should get an SSD unless you’re on a budget.
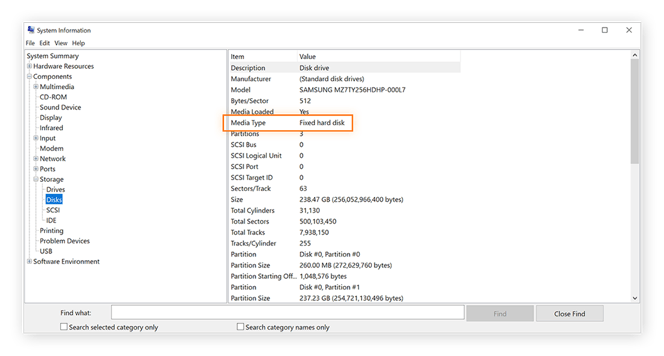
To check your device storage, type “system information” or “msinfo32” in the taskbar, and click System Information.
To see what kind of disk your machine uses, and what its capacity is, click Components on the left navigation panel, then click Storage and finally Disks. Here, look at Media Type and Size.
If you’re running out of storage, you can free up disk space by deleting junk files in your Desktop, Downloads, and Documents folders — and uninstalling games and programs you aren’t using. But before cleaning up your hard drive, back up anything important.
Hard drives can run into problems, and it’s a good idea to perform basic maintenance procedures such as defragging your disk and running CHKDSK periodically to fix 100% disk usage and nip any other issues in the bud.
Formatting your hard drive can also help revive an ailing machine. Back everything up to another drive first, and remember that you’ll have to reinstall all your programs and reconfigure all your settings and preferences again.
Get the best out of your system
Keeping track of all your computer specs and other components is time-consuming. That’s why our performance experts at Avast built an all-in-one PC specs checker that manages all of these components in a single, dedicated app.
Avast Driver Updater scans more than 25 million software sources online, checking to see if any of your hardware drivers can be updated. Then, if it finds a match, it’ll install them automatically, keeping your system fully optimized. Keep your computer running smoothly and solve driver issues effortlessly with Avast Driver Updater.