- Security
- Privacy
- Performance
A buggy PC can derail your entire week. Thankfully, the built-in Windows CHKDSK (check disk) utility can find and repair bug-causing errors easily. Keep reading to learn how to use CHKDSK to improve the performance of your computer. Then, get a powerful optimization tool to keep your computer running smoothly.

This Article Contains
This Article Contains
What is CHKDSK?
CHKDSK (check disk) is a system tool or utility on Windows operating systems that scans your hard drive for file system errors. Running the CHKDSK utility helps check and repair hard drive errors and keeps your system data organized — it’s part of good computer hygiene.
Generally, CHKDSK is run via Command Prompt in Windows 10 (or Windows 8 and 7). Using unique commands like chkdsk /f or chkdsk /r lets you scan your Windows file system — NTFS (New Technology File System) on Windows XP or later — to pinpoint data errors on your drive and fix them.
Running CHKDSK may not directly speed up your PC, but it can free up space — which often has the same effect. Even if you’ve already swapped your PC’s storage system with a faster SSD (solid-state drive), scanning it with CHKDSK can keep it clean and working fast.
When should I use CHKDSK?
Use CHKDSK regularly to scan your hard drive for corrupted files, help repair and clean up your PC, and maintain its health. CHKDSK can scan for bad sectors — ruined parts of your hard drive — even when your PC won’t turn on. That helps you find and fix hard drive errors, and frees up disk space as well.
If your PC feels buggy or slow, it could also be a sign that your hard drive is filling up or failing. Run a hard-drive test to rule out hard-drive failure before you run CHKDSK, and consider cleaning up your PC to get closer to the ideal amount of free hard drive space, which is 15-20%.
Because a CHKDSK scan can take time and manual effort, installing a PC optimizer tool may be a better option. Avast Cleanup removes junk files, increases startup speed, and maintains hard disk space to help your computer run smoothly all the time.
How to run CHKDSK on Windows
There are three main ways that you can run CHKDSK (check disk) to check your hard drive, external drives, and any SSDs you may have.
You can run CHKDSK on Windows 11 quite easily and the instructions won’t be so different from CHKDSK Windows 10. This tool has been around for several decades’ worth of Windows versions, ensuring that your PC works as it should.
Run CHKDSK from File Explorer
The easiest way to check for hard drive errors is to run the Error Checking tool via File Explorer. CHKDSK on Windows 10 works exactly the same, so you can follow these instructions if you’re still using the older version of Windows.
Here’s how to run CHKDSK from File Explorer on Windows 11:
-
Open File Explorer and select This PC. Right-click the drive containing Windows OS (usually C:) and select Properties.
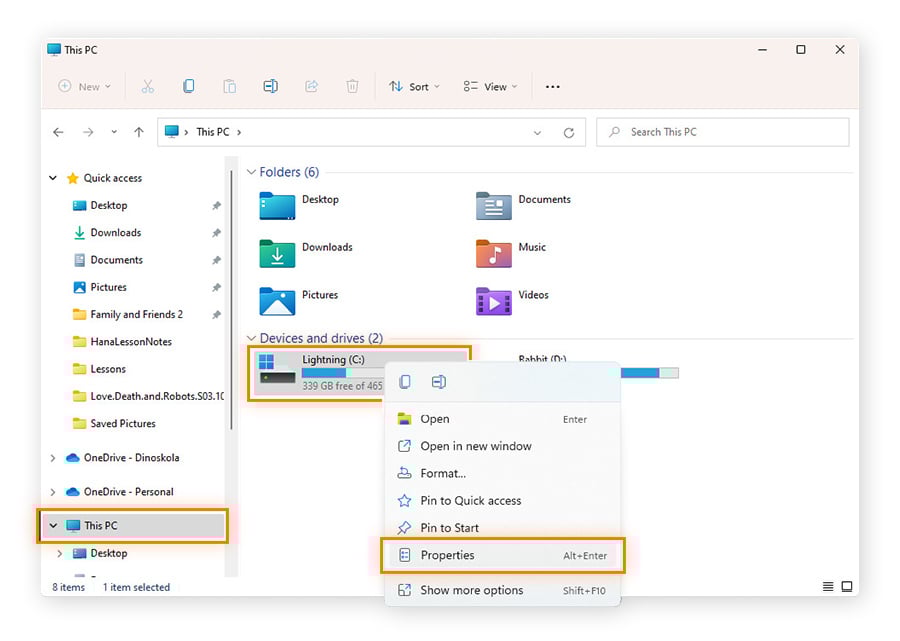
-
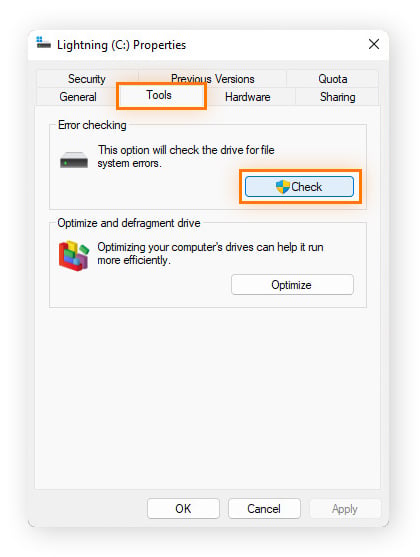
Navigate to the Tools tab and click Check.
-
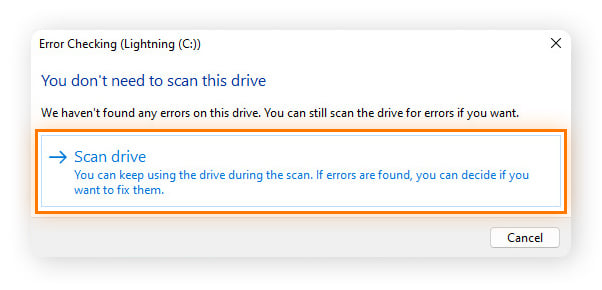
If no errors are found, a prompt tells you: You don’t need to scan this drive. If you want to scan the drive anyway, click Scan drive.
-
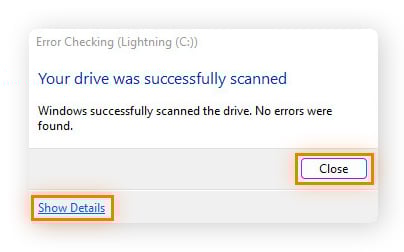
When CHKDSK is finished, click Show Details to view any errors that were repaired, or click Close to close the window.
Error Checking is the user interface for CHKDSK. In other words, it’s how to run the check disk command from a window rather than typing in specific CHKDSK commands to Command Prompt.
Command Prompt gives you more actions related to CHKDSK. But if you’ve done the above and the scan reports no errors, you don’t need to run CHKDSK from Command Prompt.
Run CHKDSK from Command Prompt (CMD)
You can also run CHKDSK from the Command Prompt. Follow these instructions for entering the CHKDSK command on Windows 11 and Windows 10 to tell your operating system exactly what to do and where.
Running the check disk command this way allows you to customize parameters. In a later section, we discuss what each CHKDSK command does.
Here’s how to run CHKDSK from Command Prompt on Windows:
-
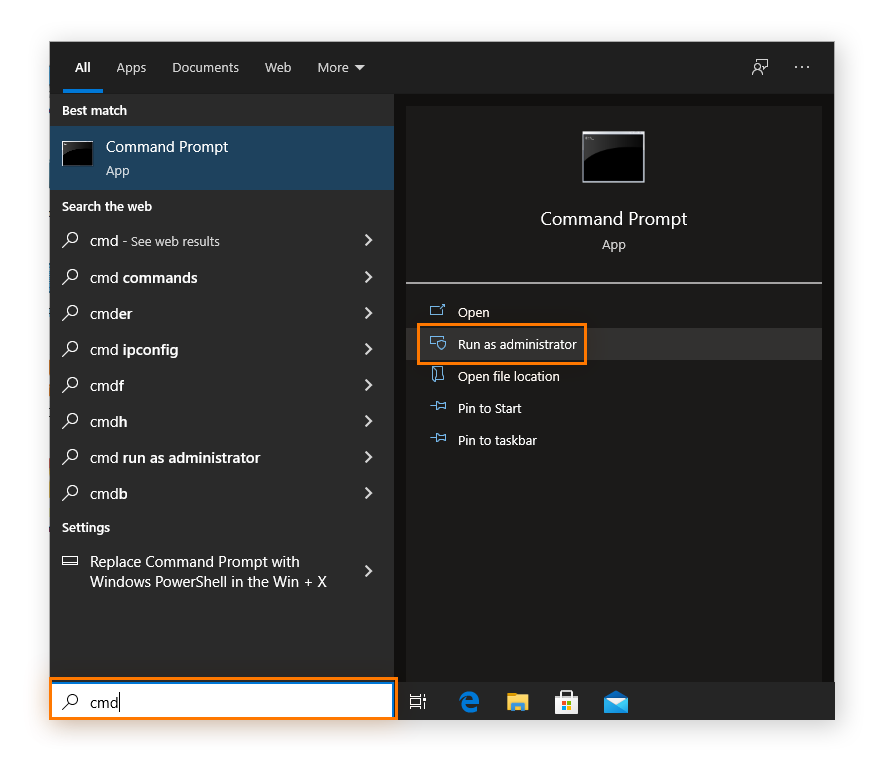
Type cmd (Command Prompt) in the Start menu search bar, then click Run as administrator.

-
Type chkdsk and hit Enter. CHKDSK will scan for drive errors and let you know if it found any you should repair, but it won’t try to fix them without a command.
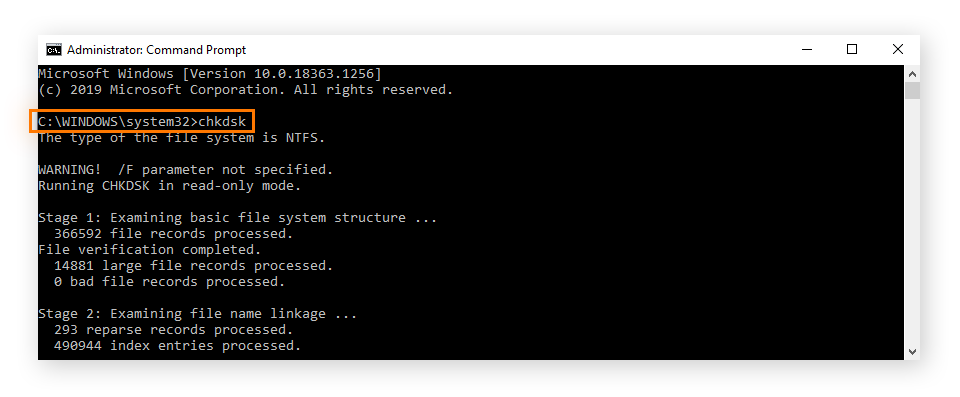
This command should work for all Windows versions, whether you’re running CHKDSK on Windows 11 or Windows 7.
Keep reading to learn about specific CHKDSK commands and how to use them to fix errors found during a CHKDSK scan.
Run CHKDSK from installation media
If your computer won’t boot up or you see the “Blue Screen of Death” upon startup, you can run CHKDSK from an external drive (like a USB) or other installation media with your version of Windows on it. This will check for errors and attempt to fix them before your Windows version boots up.
This method is also a safety net if CHKDSK can’t run because the volume is in use, or if you keep getting the “access denied” message from CHKDSK.
Here’s how to run CHKDSK from installation media:
-
Insert your bootable Windows installation media (such as CD, DVD, or USB) and restart your PC.
-
Press the F8 key multiple times before the Windows logo appears.
-
When prompted, select Repair your computer.
-
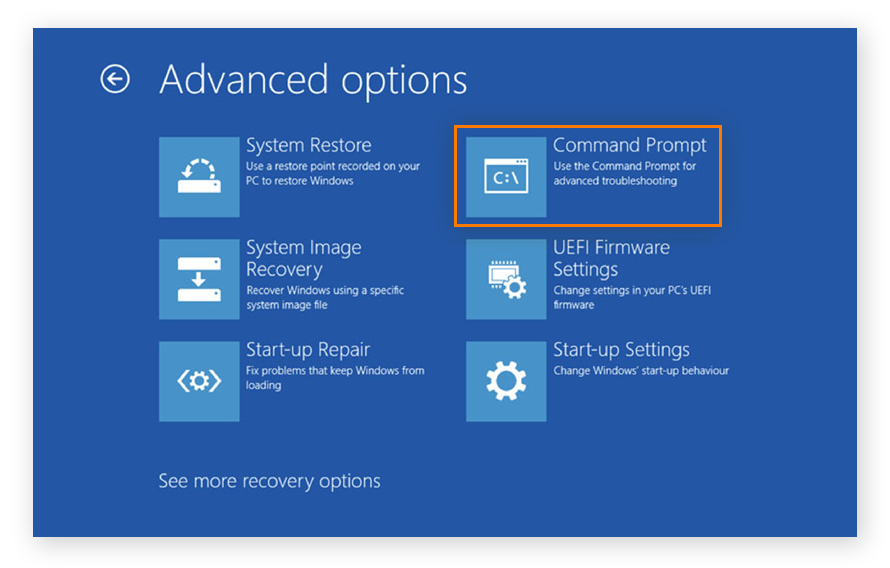
Click Troubleshoot, then Advanced options.
-
Select Command Prompt.
-
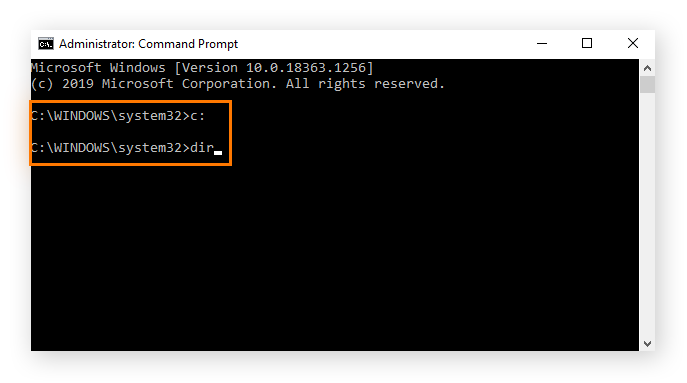
Make sure you know your home drive, in other words, which drive or drive partition on your PC contains Windows (usually the C drive by default). To test this, type c: and hit Enter. Then, type dir and click Enter. If Windows items appear in the directory, this is your home drive. Repeat that process for all drives until Windows items appear.
-
Now enter your preferred CHKDSK commands in Command Prompt.
-
If prompted to run CHKDSK the next time your system restarts, type Y, then press Enter.
CHKDSK will scan your Windows drive and attempt to repair any errors when your system reboots.
You can also install a clean Windows version from your bootable Windows media by following the steps above and selecting Install Now during step 3. We recommend backing up your data before installing a fresh Windows version.
While you’re here learning how to best maintain your computer, check out how to do a CPU stress test, and find the best driver updater for your PC.
Or, if you just want to learn more about how your computer is performing, learn how to check your CPU temperature as well as how to check your PC specs.
Using CHKDSK in older Windows versions
Older versions of Windows can still run CHKDSK just like on Windows 10 and 11. You can run Error Checking from File Explorer or use CHKDSK commands for Command Prompt, just like in the guides above. All the commands are the same.
So if you know how to run CHKDSK on Windows 11, you know how to do it on the rest.
Here’s how to access Command Prompt in older Windows versions:
-
Windows 8: On your keyboard, press the Windows icon + C to open the Charms Bar. Click Search, then type cmd.
-
CHKDSK Windows 7 and Windows Vista: Open the Start menu and type cmd.
-
Windows XP: Click Start, then click Run, then enter cmd.
For even older Windows versions, your diagnostic utility might be called ScanDisk instead. The ScanDisk utility also checks for and repairs hard drive file system errors, but it’s unable to check for errors on NTFS disk drives, which is the default file system in newer versions of Windows.
If your PC is running at snail speed even after running CHKDSK, you might need to defrag your PC to reorganize your system data. And be sure to check out our guides to cloning your hard drive, wiping an old drive clean, or formatting a hard drive.
How to change a scheduled disk check
When a CHKDSK scan is scheduled to run the next time you boot up your PC, it will run automatically. On an older or slower machine, this could increase your boot time significantly. But you can always schedule your CHKDSK scan to run later if you prefer to wait.
Here’s how to schedule your disk check:
-
Type cmd in the search field to open Command Prompt, then click Run as administrator.
-
Enter the command chkntfs /t:[000]. The [000] should be substituted by the number of seconds (up to 259,200 seconds or 72 hours) you want CHKDSK to wait before scanning. For example, chkntfs /t:60 means CHKDSK will count down from 60 seconds before starting your hard disk scan.

You can set up a scheduled disk check to fit your needs in this way. Scheduled disk checks are great for your computer, just like clearing out the Windows Registry every so often.
CHKDSK commands
There are different CHKDSK commands or parameters you can use to locate and repair issues on your hard drive. After running the basic CHKDSK command, you may not need to use additional commands if the results state that no repairs are required.
Here’s an overview of CHKDSK commands and their functions:
Should you use CHKDSK /f or /r?
-
The chkdsk /f command prevents crashes by making sure the file system directory is accurate.
-
The chkdsk /r command surrounds parts of the drive that are damaged and tells Windows not to use them — ensuring that files only get written to the working parts of the hard drive, preventing them from getting corrupted. Files in damaged parts of the drive get relocated somewhere undamaged.
Before you run CHKDSK /r, you’ll want to back up important files. There’s a small chance that part of a file is written close to an unreadable sector and it gets removed from the file system along with the rest.
And while all of this might not seem worth the trouble, running CHKDSK commands, monitoring PC performance, and updating drivers increase performance. You’ll benefit greatly from performing maintenance tasks like running these commands every so often.
Prevention is the best defense against computer problems, and most of this stuff takes mere minutes — it’s much easier than trying to recover a file that’s long, long gone.
CHKDSK troubleshooting
Here are some common errors that may occur when running a CHKDSK scan.
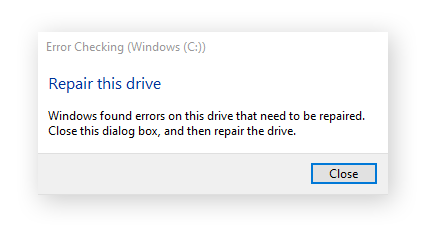
Windows found errors on this drive that need to be repaired
Sometimes after running the basic CHKDSK command in Command Prompt, or scanning with the Error Checking utility, you’ll be prompted to Repair this drive. That doesn’t mean CHKDSK failed. Instead, it indicates that CHKDSK found errors, but did not try to fix them.
Here’s how to repair the drive:
-
Close the Error Checking dialog.
-
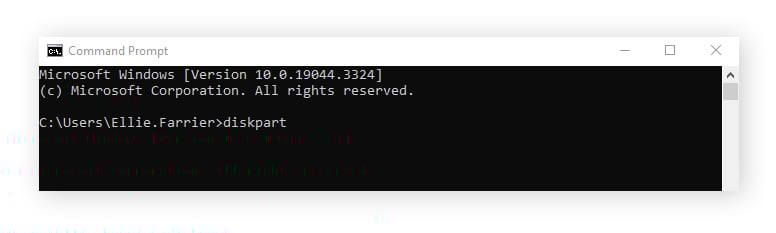
Open the Command Prompt by typing cmd into the desktop search field and selecting Run as administrator.
-
Type the command chkdsk C: /f. If the drive you’re trying to repair isn’t the C drive, replace “C” with the letter of the relevant drive.
Windows cannot run CHKDSK because the volume is in use
If you see an error message saying your drive is currently in use or in read-only mode, it means that the drive you’re trying to scan is currently active and CHKDSK can’t fix it while you’re using it.
Here’s how to check if any programs are open using the Task Manager.
-
Press the Ctrl + Shift + Esc buttons on your keyboard simultaneously.
-
Select the open app or process running on the drive you want to scan. Click End task to force the program to quit.
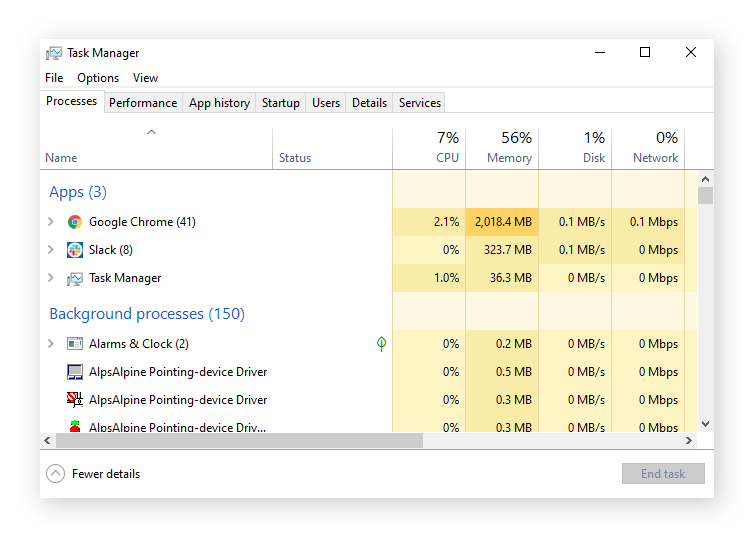
While your Task Manager is open, you should also check your disk usage percentage, which is shown in the Disk column. This number should remain under 20%. If you consistently find it hovering close to 100%, you need to identify the disk usage issue and fix it.
If you find yourself in a constant battle against error messages, 100% disk percentage, and a slow-performing PC, you may want to upgrade from an HDD to an SSD.
There’s also a chance that that malware is keeping your drive from getting checked. Run a scan with antivirus software, restart, and see if that allows you to use CHKDSK.
Resolve using Safe Mode
If CHKDSK cannot run because the volume is in use, you may need to reboot your computer from Safe Mode.
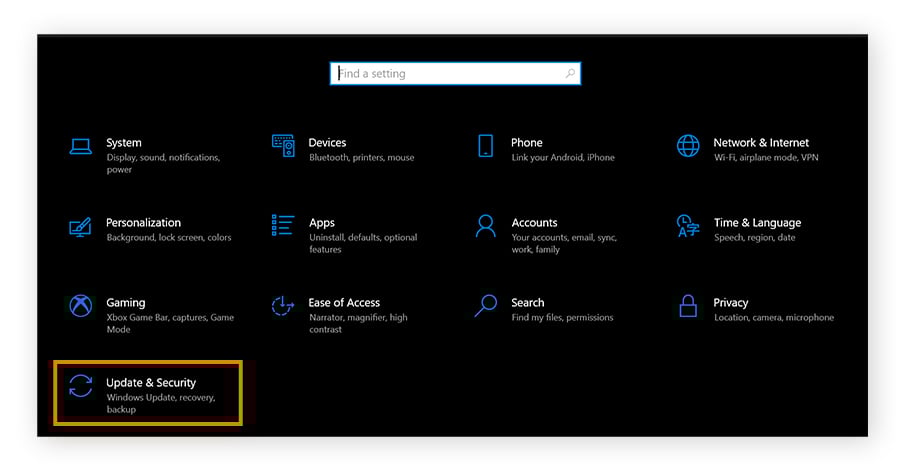
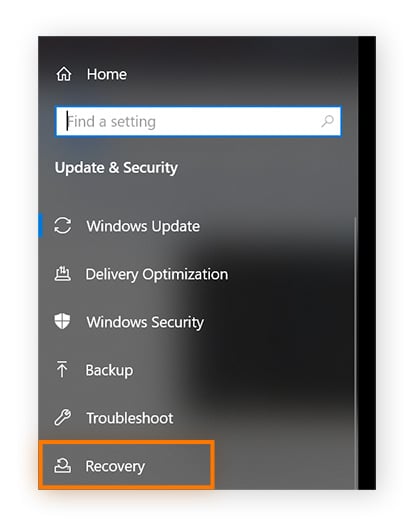
Safe Mode starts Windows with only the essential processes, so it’s much less likely that some errant app will keep the drive too occupied to run CHKDSK. Here’s how to reboot into Safe Mode in Windows 11 or 10:
-
Click Start and select Settings.

-
Click Update & Security.
-
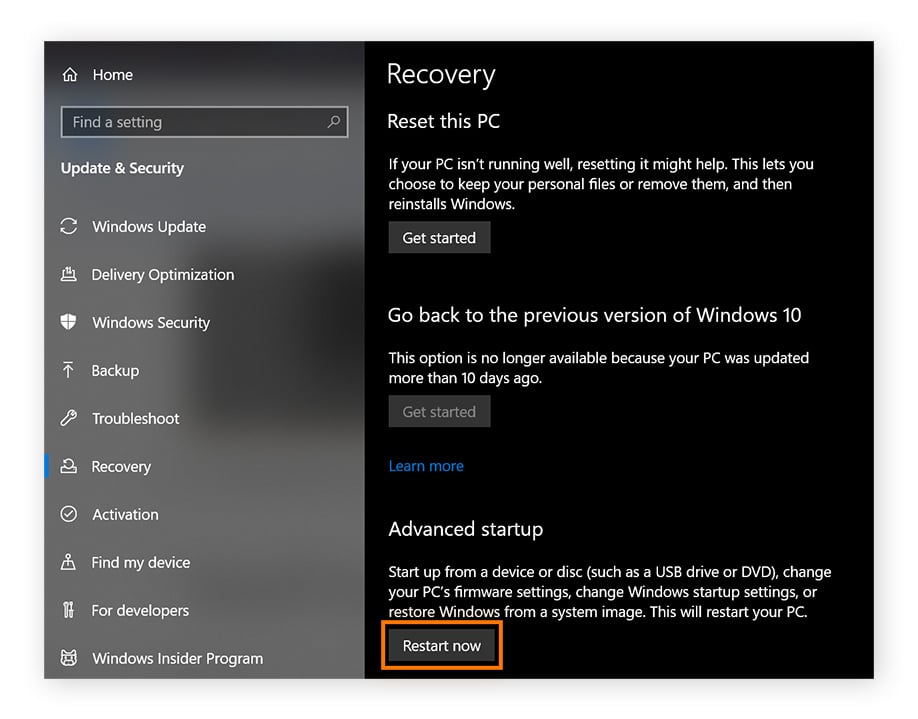
Click Recovery on the left.
-
Under Advanced startup, click Restart now.
-
When you restart, you’ll come to a screen asking you to choose an option. Click Troubleshoot > Advanced Options > Startup Settings > Restart.
-
The PC will restart again and present you with a list of options. Hit 4 or F4 to start in Safe Mode, or press 5 or F5 to enter Safe Mode with internet.
The volume should now be freed up so you can discover damaged segments by running CHKDSK using one of the guides above.
CHKDSK seems to be frozen
CHKDSK could take several hours, so you might need to be patient. But if Windows CHKDSK is stuck at 11% or thereabouts and it’s definitely not moving, cancel the scan and try to fix the problem.
Here are some ways to fix CHKDSK freezing:
-
Perform a backup. Copy and paste all your most important files to an external HDD, because the freezing might be a sign your hard drive is failing.
-
Defragging a hard drive can also fix a CHKDSK that’s going prohibitively slowly. You can do this by typing “defrag” next to the Windows start button and choosing Defragment and Optimize Drives.
-
Give Disk Cleanup a shot. Open the Windows Start menu and type “disk cleanup,” then select Run as Administrator.
-
There’s a command that checks for important system files that aren’t working correctly and fixes them. Open Command Prompt, type “sfc /scannow,” and restart your computer afterward.
-
Open Command Prompt again and type dism.exe /online /cleanup-image /restorehealth. This doesn’t fix more parts of your Windows system that are damaged — instead, it fixes the copy that SFC /scannow draws from, like a backup copy of Windows.
That’s how you can fix a stuck CHKDSK on Windows 10 or 11. If your CHKDSK is stuck at 12% and the above hasn’t worked, try repairing Windows with another Windows installation media or replacing the HDD. Unfortunately, if your HDD is failing, chances are the rest of the components are just as old — it may be worth considering a new computer.
Errors identified on the drive
The best thing to do if you get this message is to run a CHKDSK parameter that repairs errors on the drive — the chkdsk /r command is great for this. Once you run it, there’ll be no more corrupted parts on the usable disk space, because they’ll be marked as unusable.
There’s a small chance some important data gets deleted when you run chkdsk /r, so do a backup before running it.
An increase in errors likely means your hard drive is aging. If CHKDSK is returning with tons of errors and your computer is overheating, your computer might be done.
The disk is write protected
All you need to do is make use of another CHKDSK command. Add /x to your CHKDSK input, and your disk will be dismounted before the scan is performed. If you’ve backed up your files and you’ve decided to go ahead with the repair process, enter chkdsk C: /f /r /x to dismount the disk and run the repair scan.
If Windows cannot run disk check — write-protected drive being the cause — you may need to try alternative fixes. Let’s use the diskpart command to make the drive available for scanning.
-
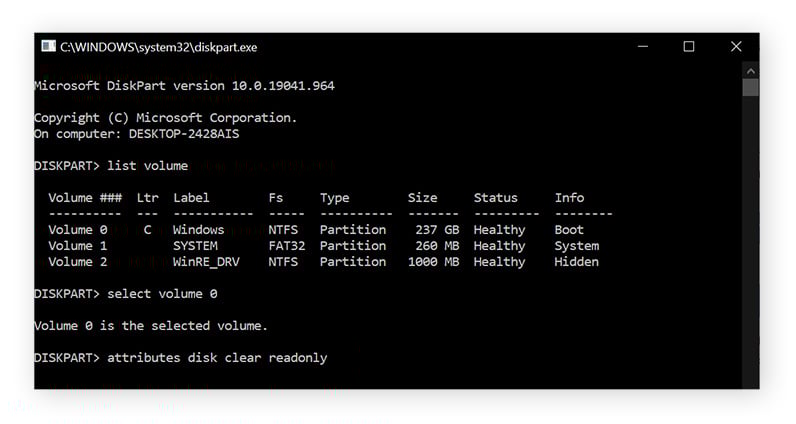
Open Command Prompt. Type diskpart and press enter. Click Yes on the screen that pops up.
-
In the new window, type list volume and hit enter.
-
Select your main drive. It’s probably going to be the first one listed and selected by default. Just in case, type select volume 0 (substituting 0 with the number of the drive you want to scan) and hit Enter.
-
Now type attributes disk clear readonly and hit Enter. The volume should now be dismounted and ready to scan.
If all else fails, you can follow the instructions to run CHKDSK from installation media. That’s the last safety net in case all other options yield a CHKDSK write-protected message.
Maintain your PC’s performance with Avast Cleanup
Regularly running a CHKDSK scan on your Windows computer is good computer hygiene. It’s also important to use a dedicated performance tool.
Avast Cleanup is designed by computer optimization experts to scan and clear clutter from your disk automatically. It’ll also check to see which programs are slowing you down, and it can put them to sleep to boost performance. With automatic maintenance and one-click repairs, Avast Cleanup helps your machine run as smoothly as the day you got it.
FAQs
Is CHKDSK safe?
Yes. CHKDSK scans the hard drive for errors — such as the blue screen of death — and can help make your computer safer. However, the chkdsk /r command may delete data if it finds a bad sector, so ensure to do a backup before running it.
How long does CHKDSK take?
CHKDSK can take anywhere between 20 minutes and a few hours. Make sure you’ve set enough time aside for this, as canceling it can cause file corruption. However, sometimes CHKDSK freezes and there’s nothing you can do but cancel it. It’s best to back up your data before running chkdsk /r.
Does CHKDSK fix corrupt files?
No. CHKDSK is not a data recovery tool and will not repair corrupted files or recover lost or damaged files. But it does check if the state of the information on your disk is safe and consistent, and CHKDSK can help you repair formatting issues with your hard drive.
How does CHKDSK fix errors?
CHKDSK makes sure the file system directory and contents of the drive match each other. It also ensures files are written to clean and undamaged parts of the disk. The result is fewer crashes and less data loss.
What is the difference between CHKDSK /R and CHKDSK /F?
The chkdsk /f command compares the file system directory with what’s actually on the drive and adjusts the directory to prevent crashes. On the other hand, the chkdsk /r command checks for parts of the disk that are damaged and reallocates data to undamaged parts.
What does the command CHKDSK C: do?
The chkdsk C: command runs CHKDSK on your C drive. For most people, the C drive is the main drive. With the same command, you can specify other disks you want to check by replacing chkdsk C: with chkdsk D: or any other letter corresponding to a specific drive.
How do I fix corrupted files in Windows 10?
The best way to fix corrupted files is to restore a previous Windows version from before the files were corrupted. You can also open Command Prompt, then type sfc /scannow and reboot your computer. Running CHKDSK commands can help avoid file corruption that can cause your computer to crash often.
Does CHKDSK create log files?
Yes, CHKDSK creates log files that can be found in the Event Viewer. Open Event Viewer, click Windows Logs > Applications, and select Filter Current Log. Where <All Event IDs> is written, type 26226 and click OK. CHKDSK’s log files provide clear definitions of what went wrong and where.
What customers say
More Performance Articles
Facebook Session Expired: Causes, Solutions, and Prevention

How to Get Your Mouse Cursor Back: 11 Tried and Tested Methods

How to Split Screens on Your PC or Laptop (Windows 10 & 11)

Your Phone Is Not Registered On a Network: What It Means and How to Fix It

Why Won't My iPhone Turn On? 6 Easy Fixes to Try

Why Your iPhone Gets So Hot and How to Fix It

Why Is My Ping So High and How to Reduce It

Why Your Keyboard Isn’t Working and How to Fix It in 6 Easy Steps

How to Right-Click on Mac With or Without a Mouse

How to Test for Packet Loss and Check Your Internet Quality

How to Fix Common Printer Problems

Why Does My Phone Keep Restarting and How Can I Fix It?
Performance Tips
Performance
Ellie Farrier
17-02-2022